

Power Automate can do a lot, but the real question is what it can do for your business. In this article, we’re walking through real flows we’ve built for clients, from approval chains and document processing to AI-powered workflows and full system integrations. Every example started with a specific business problem someone needed solved.
Our Power Automate consultants at Vidi Corp have delivered more than 200 projects, working with organisations like the UK Ministry of Defence, American Express, and Delta Airlines. In 2025, we were also named the best data analytics and automation consultancy at the UK Enterprise Awards.
So these aren’t templates pulled from a demo library. They’re working solutions, built and deployed. If you spot a use case that looks like something you’re dealing with, get in touch. We can build you something similar, shaped around the way your systems and teams actually work.”
Power Automate enables organisations to automate processes across systems, applications, and teams without heavy custom development. From simple notifications to advanced AI-driven workflows, it supports a wide range of automation scenarios through 3 core flow types.
Together, these capabilities allow Power Automate to handle every kind of RPA implementation from basic task automation to complex, end-to-end business processes that combine data, systems, and AI.
Microsoft’s template library is the fastest way to get your first Power Automate flow running. Templates are pre-built flows you can deploy in a few clicks and customise to fit your exact process – no coding required. To access them, open Power Automate, select Create from the left menu, and choose Start from a template. Below are the 7 templates we recommend as starting points, with guidance on how to get the most out of each one.
How to find it: In Power Automate, select Create → Start from a template and search “save email attachments SharePoint.” The template is published by Microsoft.
This template triggers every time a new email arrives in a specified mailbox and saves any attachments directly to a SharePoint folder. It removes the need to manually download, rename, and file documents received over email.
We often use this template for clients when we need to automate data refresh of Power BI reports which is essential for automated business intelligence. For example one of our clients relies on Hootsuite for social media management. Hootsuite API is very limited and doesn’t expose the data that we need. Hootsuite does offer native functionality to schedule automated recurring emails with data exports though which we used as a workaround. We then built a Power Automate script to move files from those emails to a SharePoint folder.
What to customise:
How to find it: Search “notify Teams SharePoint item modified” in the template library.
This template monitors a SharePoint list for any changes and posts a message to a Teams channel when an item is created or updated. It is commonly used for automation in accounting, projects or operations teams to keep everyone informed without needing to check the list manually.
What to customise:
How to find it: Search “request approval selected file SharePoint” in the template library. This is a button-triggered flow, it appears in the SharePoint file menu when set up correctly.
When a user right-clicks a file in SharePoint and selects this flow, it sends an approval request to a specified manager. The manager receives an email or Teams notification with Approve and Reject options, and the requester is notified of the outcome automatically.
What to customise:
How to find it: Search “push notification email from boss” in the template library. Requires the Power Automate mobile app installed on your phone.
This template monitors your Outlook inbox for emails from a specific sender and sends a push notification to your mobile device immediately. It is useful for roles where certain senders always require a fast response — a line manager, a key client, or an escalation mailbox.
What to customise:
How to find it: Search “create Planner task flagged email” in the template library.
When you flag an email in Outlook, this template automatically creates a task in Microsoft Planner with the email subject as the task title. It bridges the gap between inbox and task management — anything that needs action gets captured in Planner without manual re-entry.
What to customise:
How to find it: Search “weekly digest SharePoint list” in the template library.
This template runs on a weekly schedule, retrieves items from a SharePoint list, formats them into an HTML table, and emails the summary to a specified address or distribution list. This SharePoint Automation is commonly used for weekly status reports, pending approval digests, or project updates.
What to customise:
How to find it: Search “copy SharePoint list items Excel” in the template library.
Every time a new item is added to a SharePoint list, this template adds a corresponding row to an Excel table stored in OneDrive or SharePoint. It is useful when downstream reporting or analysis happens in Excel but data entry happens through SharePoint forms or Power Apps.
What to customise:
Power Automate delivers the biggest returns when it removes repetitive, low-skill tasks from people who shouldn’t be doing them. The table below covers 11 automations we build regularly for clients as part of our RPA managed services – each one chosen because the time saved is immediate and the setup is straightforward. For each one, you’ll find the manual alternative, a realistic time saving based on real implementations, and the exact trigger and actions needed to build it yourself.
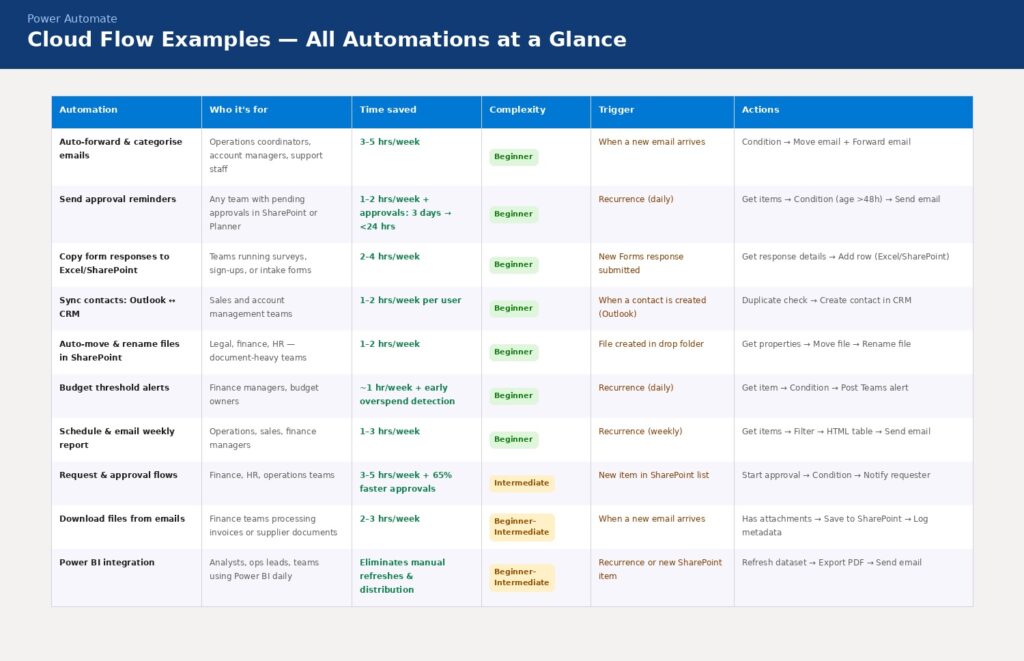
Without automation, someone manually reads incoming emails, decides where each one belongs, moves it to a folder, and forwards relevant ones to the right person. Across a busy inbox, this takes 30–60 minutes a day – most of it low-value repetition.
Time saved: We typically see clients reclaim 3-5 hours per week just from inbox triage. For roles that live in email – operations coordinators, account managers, support staff – this is one of the fastest wins we deliver.
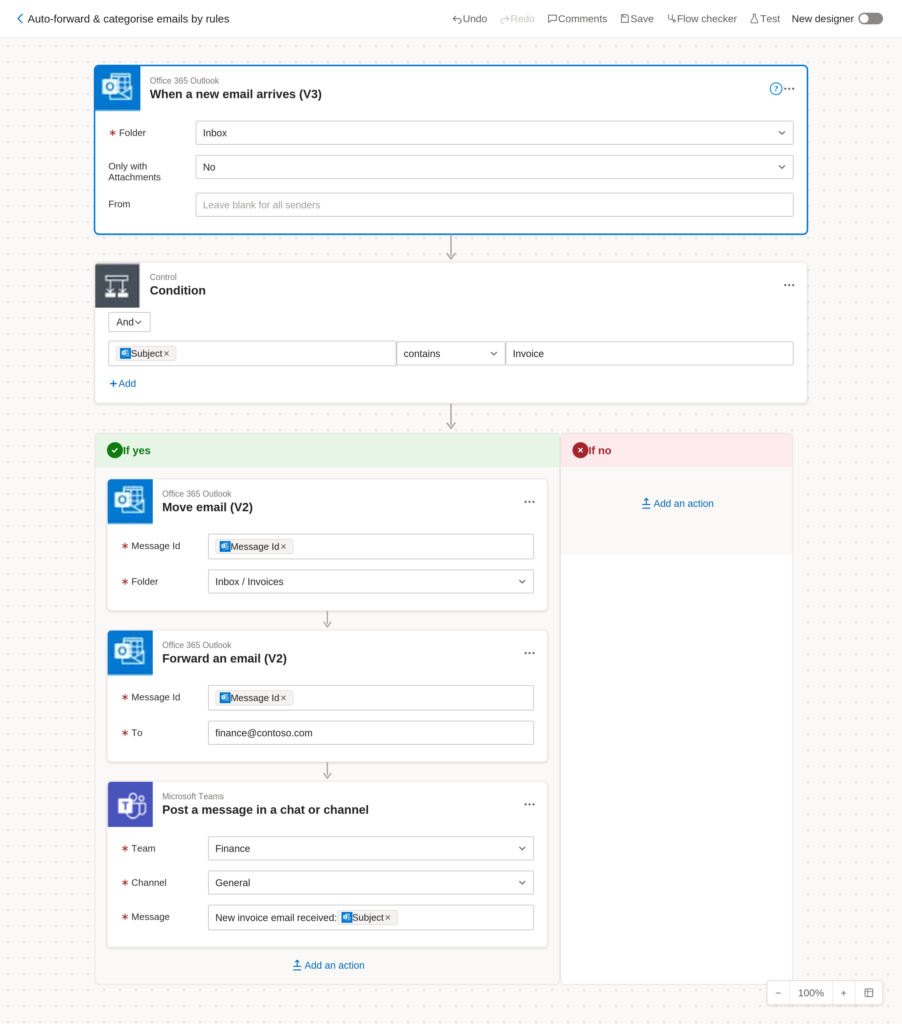
How to set this up:
Manually chasing approvals means someone has to remember what’s pending, check when it was sent, decide it’s overdue, and write a follow-up. That process breaks down fast when multiple approvals are in flight at once.
Time saved: Clients typically spend 1-2 hours per week chasing approvals before automation. More importantly, approval cycle times drop significantly – we’ve seen clients cut average approval time from 3 days to under 24 hours.
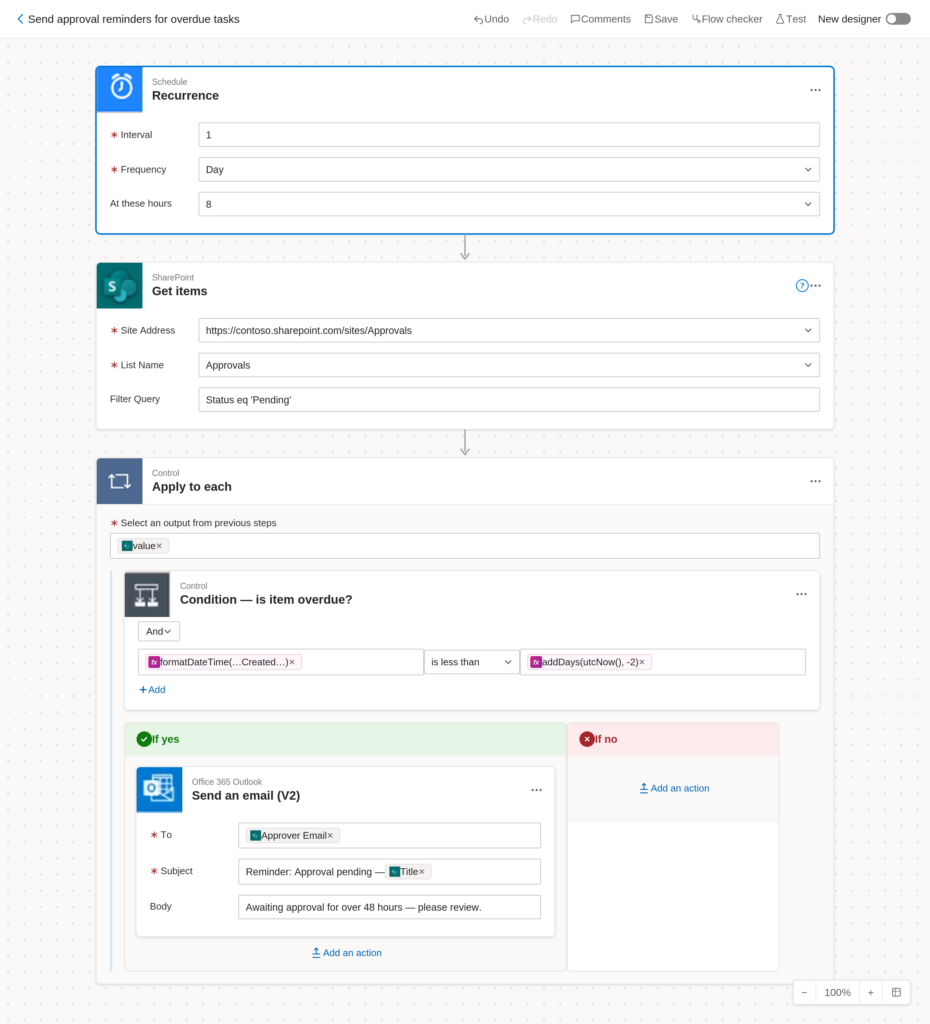
How to set this up:
The manual version: someone opens Microsoft Forms, exports responses, pastes them into a spreadsheet or tracker, and reformats the columns. If forms are submitted frequently, this becomes a recurring task that compounds quickly.
Time saved: This is one of the most common flows we build for clients. Depending on volume, it saves 2-4 hours per week. For teams running regular surveys, event sign-ups, or intake forms, the saving is immediate from day one.
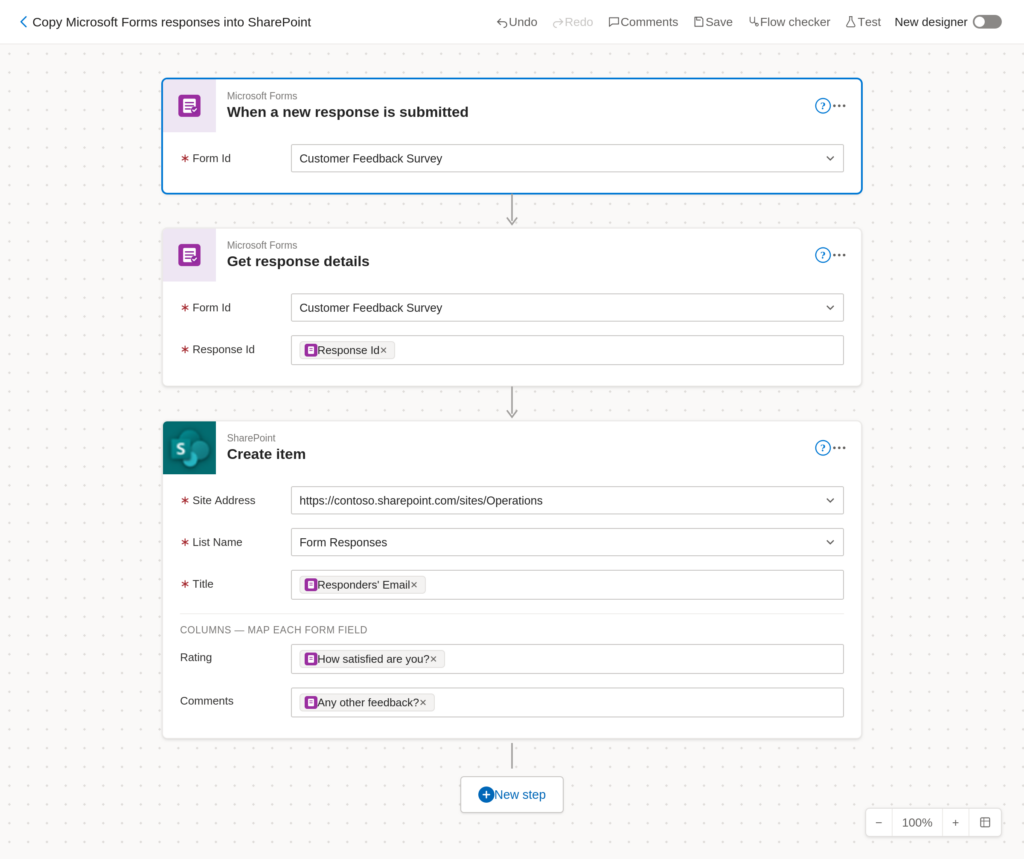
How to set this up:
Without automation, adding a new contact to Outlook and then manually recreating it in a CRM – HubSpot, Salesforce, or Dynamics – is done by hand. Small individually, the task adds up quickly across a sales or account management team.
Time saved: 1-2 hours per week per user. For sales teams where contact hygiene is critical, this also reduces errors and the time spent fixing duplicate or incomplete records.
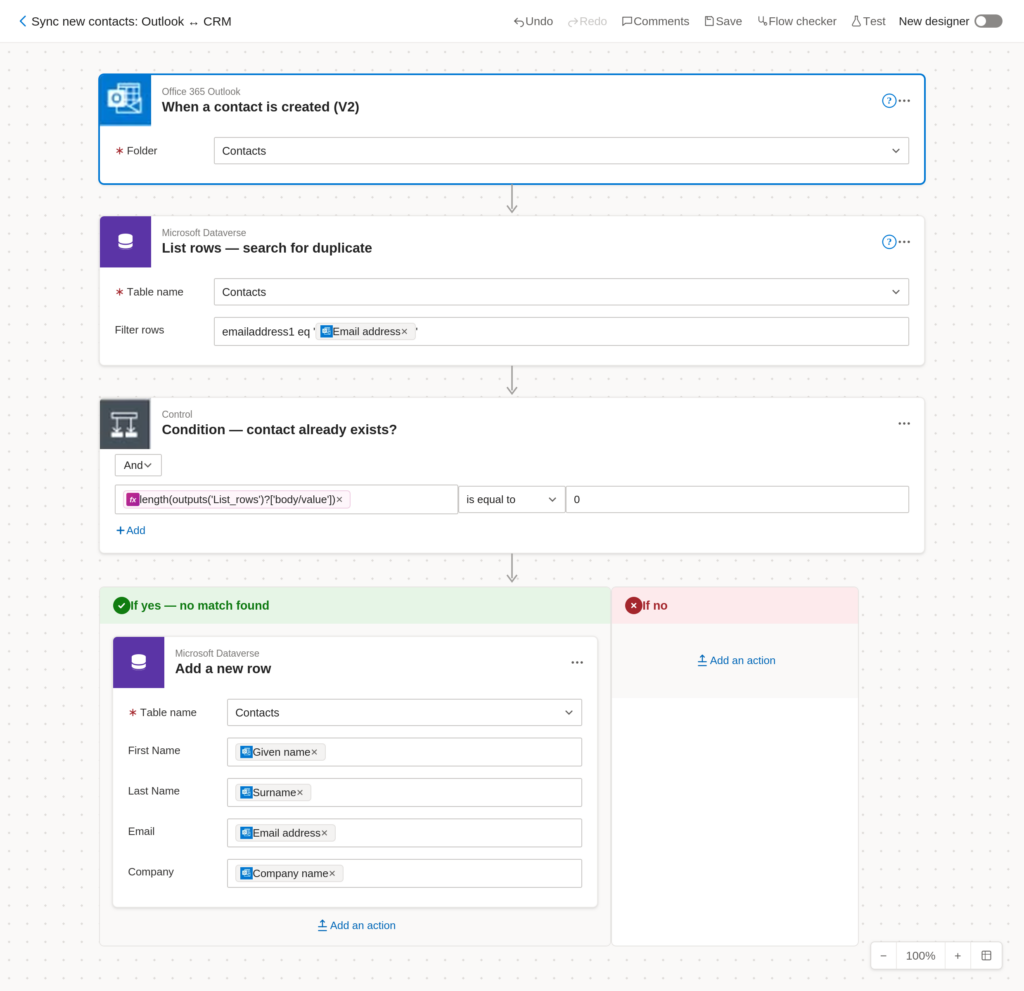
How to set this up:
Manual approval processes usually involve emailing a document, waiting for a reply, chasing the approver, and then updating a tracker by hand. When multiple people need to approve — or when the chain involves more than two steps — the process becomes slow and hard to track.
Time saved: This is the highest-impact automation we build for clients in operations, finance, and HR. Teams typically recover 3–5 hours per week. More importantly, approval bottlenecks that used to take days are resolved within hours.
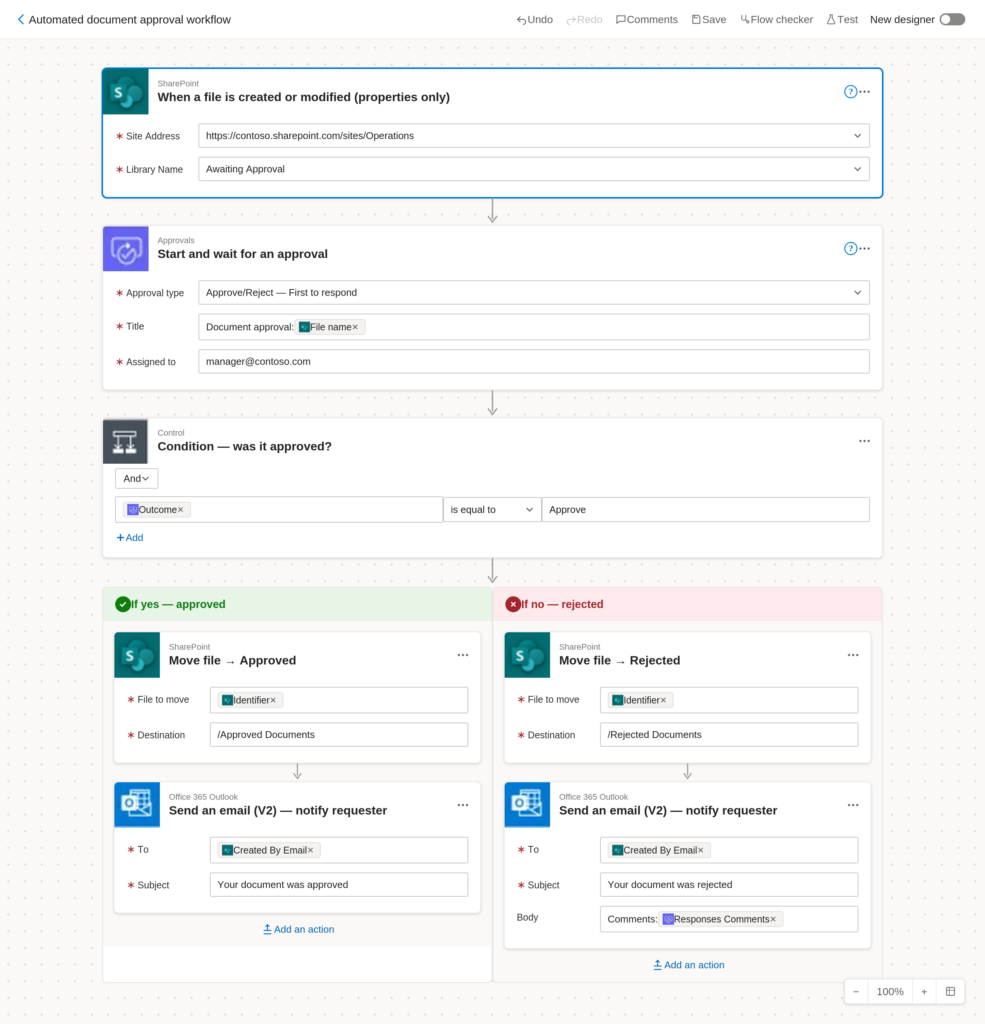
How to set this up:
Manually monitoring spend means exporting reports, checking figures against a budget, and deciding whether to escalate – usually too infrequently to catch issues early. By the time a manager is told, the overspend has already happened. We have seen over the years that this is one of the most requested procurement automations among our clients. The finance teams essentially need to be notified when a budget is close to being breached by procurement.
Time saved: Around 1 hour per week on monitoring tasks. The real value is earlier visibility – clients consistently tell us this flow pays for itself the first time it catches an unexpected overspend.
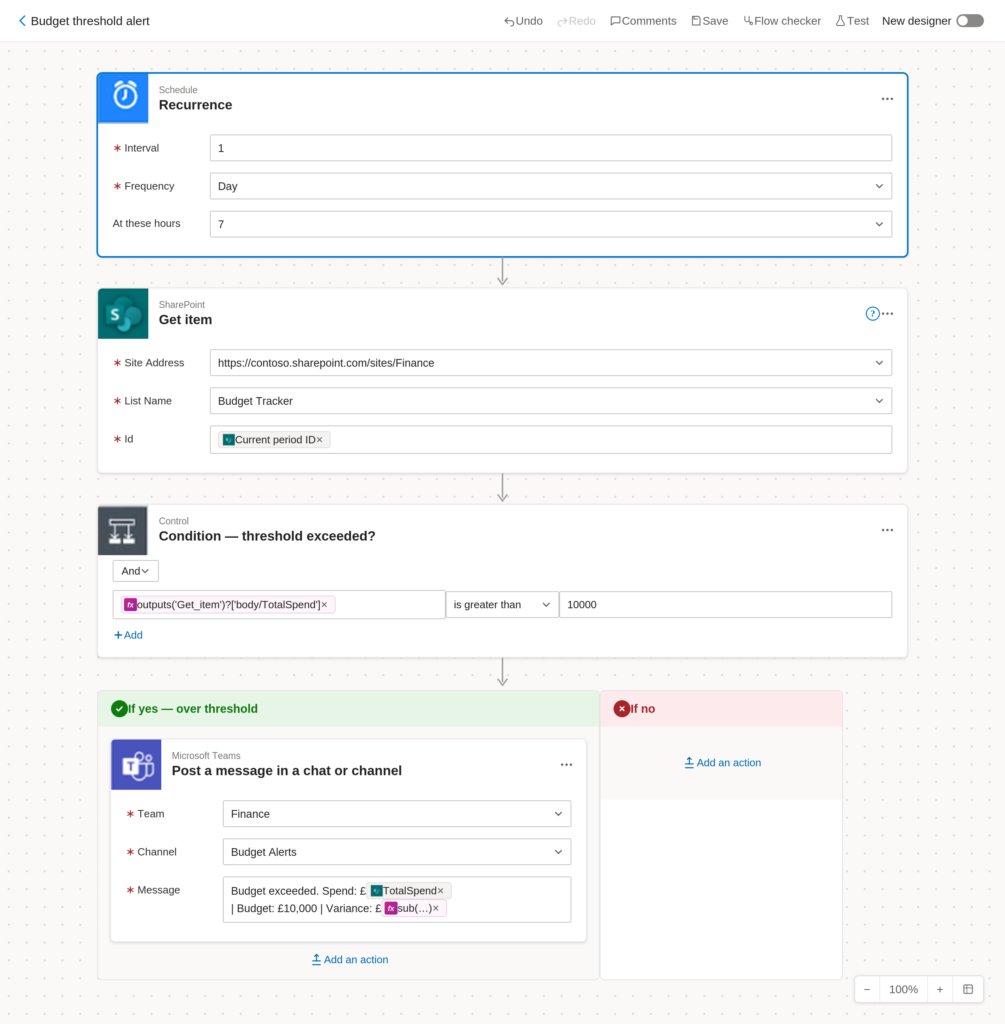
How to set this up:
Teams that receive files regularly — reports, client documents, submitted forms — often have someone manually sorting them into folders and renaming them to match a naming convention. It is straightforward work, but it is also constant.
Time saved: 1-2 hours per week for teams with high file volume. For document-heavy environments like legal, finance, or HR, we regularly see this saving double.
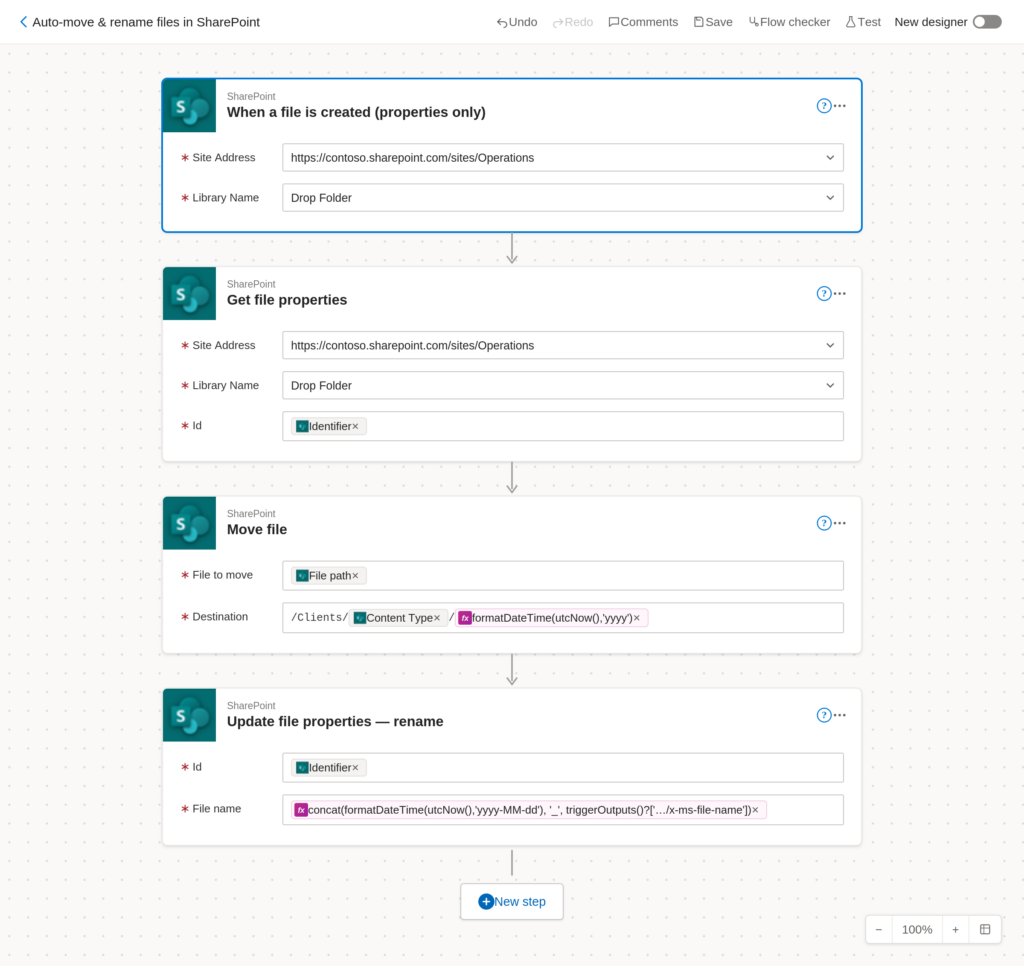
How to set this up:
When a form is submitted – a quote request, an onboarding form, a work order – someone typically opens a Word template, fills in the details, exports it as a PDF, and emails it out. For high-volume teams, this is a significant time cost.
Time saved: 2-4 hours per week for teams processing 10+ submissions weekly. We build this flow frequently for sales teams sending quotes and HR teams issuing offer letters.
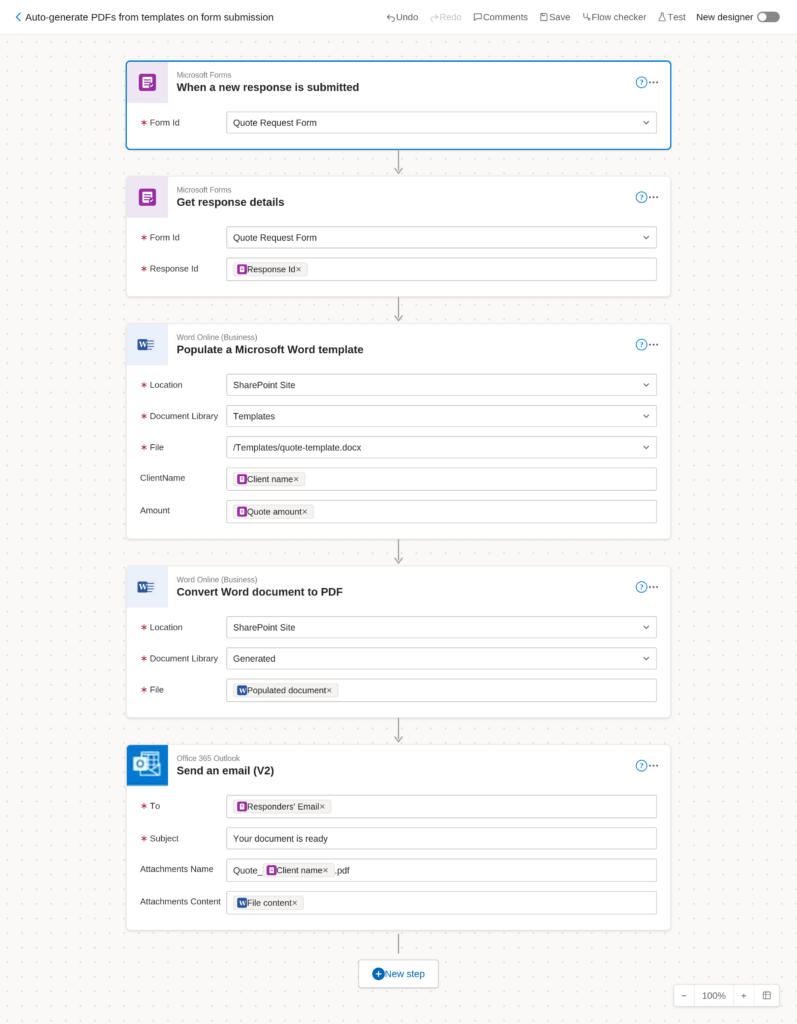
How to set this up:
The manual version involves pulling data from one or more sources, compiling it into a report or spreadsheet, formatting it, and emailing it to a distribution list — every week, without fail. For recurring reporting, this is pure repetition.
Time saved: 1–3 hours per week depending on report complexity. For managers who receive these reports, the consistency and reliability also removes the need to chase or follow up.
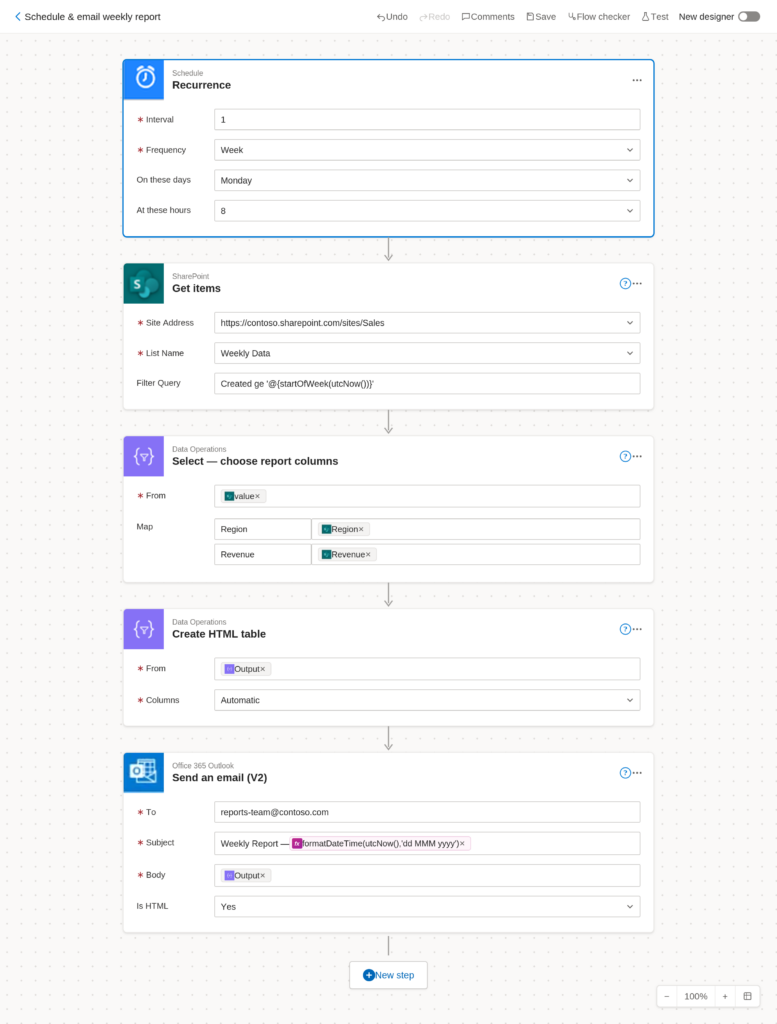
How to set this up:
Complexity: Intermediate
Most approval processes such as invoicing, annual leave, expenses, purchase orders still run on email chains and shared spreadsheets. Requests get missed, managers forget to respond, and no one has a clear view of what’s pending.
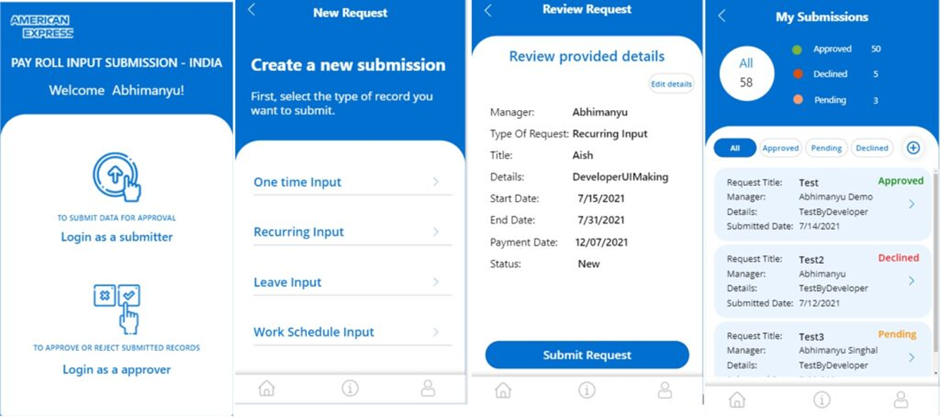
Our Power Automate consultants built a centralised expense approval workflow for American Express. Employees submitted claims through a Power Apps canvas apps front end, receipts were attached digitally, and flows routed requests to the right managers automatically — with reminders sent until a decision was made.
Approval times dropped by over 65%, follow-up emails were eliminated, and the finance team had a single source of truth for every claim. Reimbursements became faster and audits straightforward.
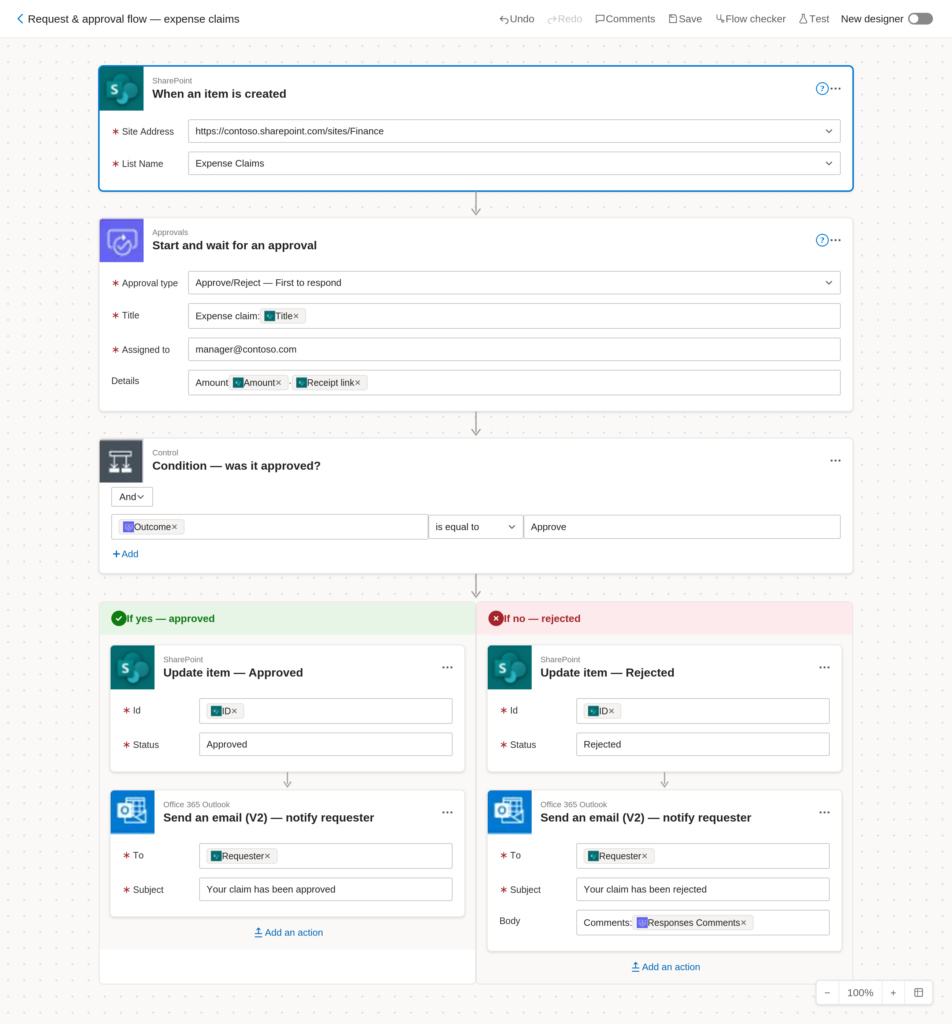
How to build it:
Complexity: Beginner–Intermediate
Teams relying on Power BI for daily decisions often still refresh datasets manually or distribute reports by hand. When refreshes are missed, stakeholders work from outdated data – and no one knows until a decision has already been made on the wrong numbers.
We integrated Power BI and Power Automate for automated refresh and distribution flows for teams where this was a recurring problem. Datasets refreshed automatically on a schedule or when new data landed in SharePoint. Reports were exported to PDF and emailed to distribution lists, and alerts notified key users when specific metrics changed.
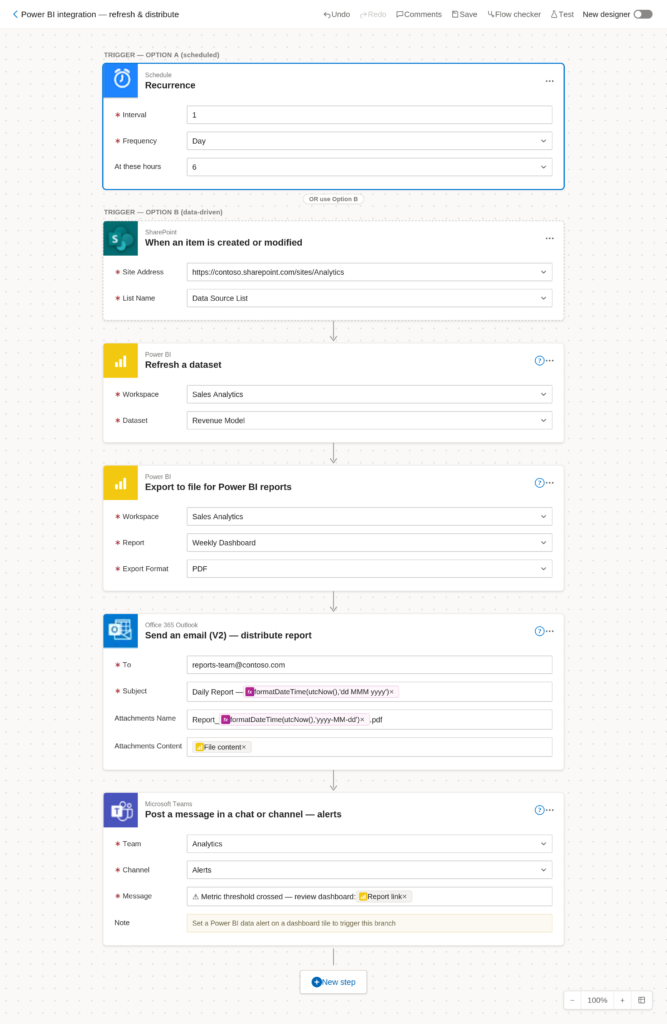
The result was a fully automated reporting cycle. Dashboards stayed consistently current, reports reached stakeholders without anyone pressing send, and teams spent time on analysis rather than administration.
How to build it:
Some automations require more than a standard flow. The examples below involve custom connectors, AI processing, desktop automation, or multi-system integrations that go beyond what most users can build without prior Power Automate experience. We include them here because they represent some of the highest-impact work we do for clients — and because knowing what’s possible is often the first step.
If any of these match a process you’re dealing with, we can scope it with you.
Complexity: Intermediate
Generating reports, proposals, or compliance documents manually means opening a template, pasting in data, reformatting, and exporting – for every single document. As volume grows, inconsistencies creep in and the admin load becomes unsustainable, and that’s before the finished documents even reach a Power Automate document approval workflow for sign-off.
Lift Consultancy, a UK engineering consultancy, had consultants manually copying data from iAuditor into Word reports after every client visit. As the business expanded across multiple locations, the process created delays, inconsistent formatting, and a growing administrative burden per consultant. We set up a Power Automate populate a Microsoft Word template flow, pulling project details from SharePoint into standardised layouts. When new audit data was submitted, the correct fields were populated automatically, formatting was applied consistently, and reports were generated without manual input. As a result of this RPA outsourcing project, the client saved 80+ hours per week and scaled this flow to support over 40% business growth without increasing headcount.
Why it needs a consultant: Word templates must be structured correctly using Power Automate – compatible field tags, and the data mapping between source fields and document placeholders needs careful setup to handle edge cases – missing values, conditional sections, and variable document lengths. Without this groundwork, generated documents contain errors or blank fields that undermine the whole point of automating.
Complexity: Intermediate
Onboarding a new employee involves the same set of tasks every time: creating accounts, assigning licences, granting access to the right SharePoint folders, adding them to the right Teams channels, and sending welcome communications. Done manually by IT or HR, this takes hours per hire and is prone to steps being missed – access not granted, licences not assigned, new starters arriving on day one without what they need. Based on our experience, this is a very impactful workflow automation for enterprise clients since they onboard a large number of employees on ongoing basis.
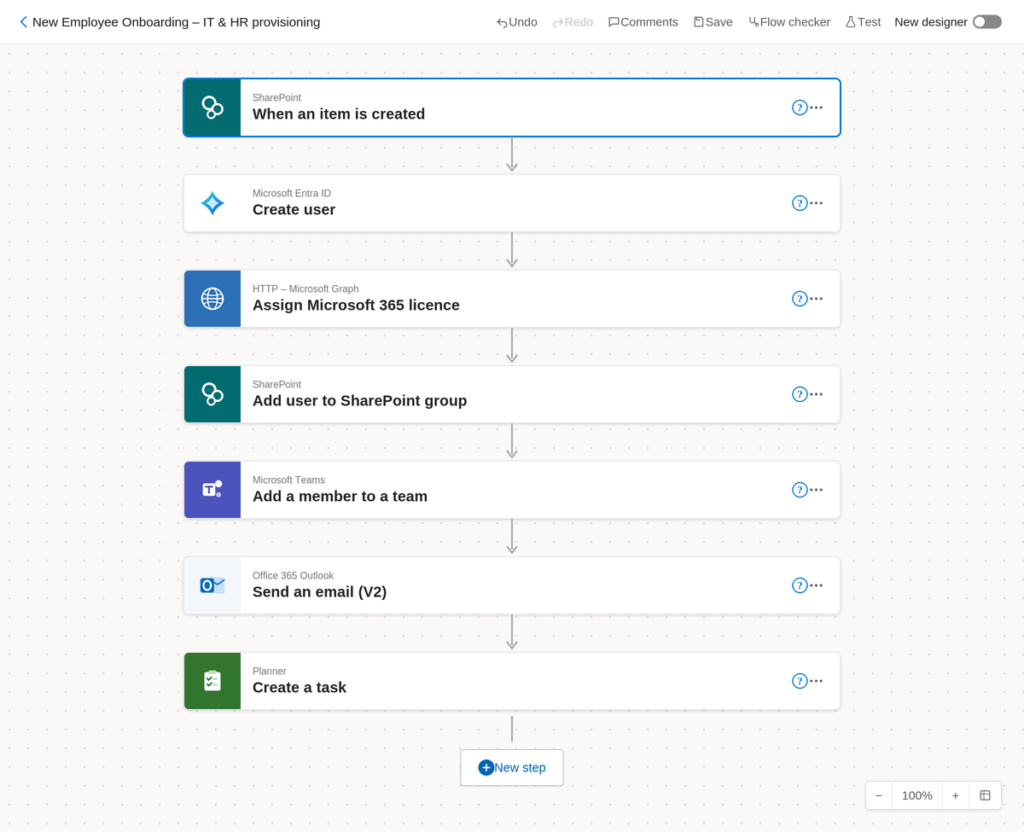
We built automated onboarding flows for clients where IT teams were spending half a day on every new starter. When HR submitted a new starter form in SharePoint, the flow created the user in Microsoft Entra ID, assigned the correct M365 licence based on role, added them to the relevant SharePoint groups and Teams channels, and sent a personalised welcome email — all without IT touching a single setting manually. Every new starter received the same complete setup in minutes.
Why it needs a consultant: This flow spans multiple Microsoft services — Entra ID, Graph API, SharePoint, Teams, and Outlook — each requiring separate authentication and connector configuration. Licence assignment via the Graph API requires HTTP connector setup and correct permission scopes, which sits outside what most Power Automate users encounter in standard flows. Role-based logic also needs to be designed carefully upfront so the flow handles different departments and seniority levels without manual intervention each time.
A sales team was spending hours each day manually copying order data from PDF confirmations into Excel — a slow, error-prone process that caused mistakes in stock allocation and invoicing. We automated the full pipeline using Power Automate and AI Builder: incoming PDFs were captured from email, key fields extracted using Power Automate OCR, and the data written directly into SharePoint, with notifications sent for review. The business process automation removed 5 hours of manual work per week and scaled to handle hundreds of PDFs daily.
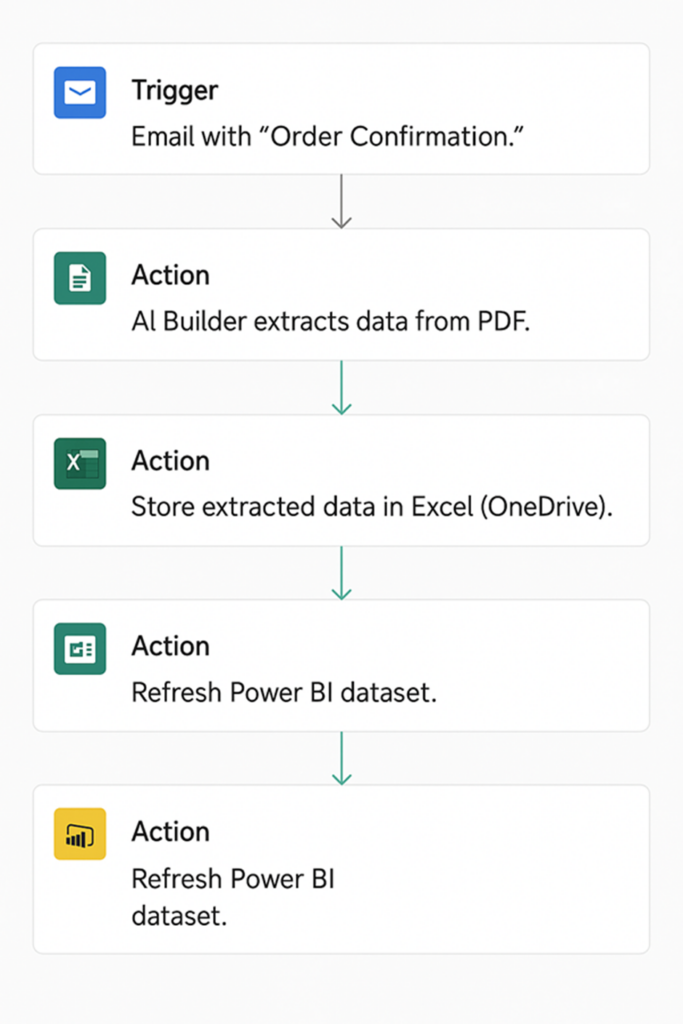
Why it needs a consultant: AI Builder models require training on your specific document formats, and the extraction logic needs tuning to handle layout variations reliably.
A CEO receiving high volumes of daily email had no reliable way to separate urgent messages from newsletters, CCs, and low-priority threads. We built a flow that sent each incoming email to ChatGPT via API, received a priority classification in return, and used that response to flag, tag, or forward the message automatically. The result was an AI-assisted inbox that surfaced critical emails without manual review.
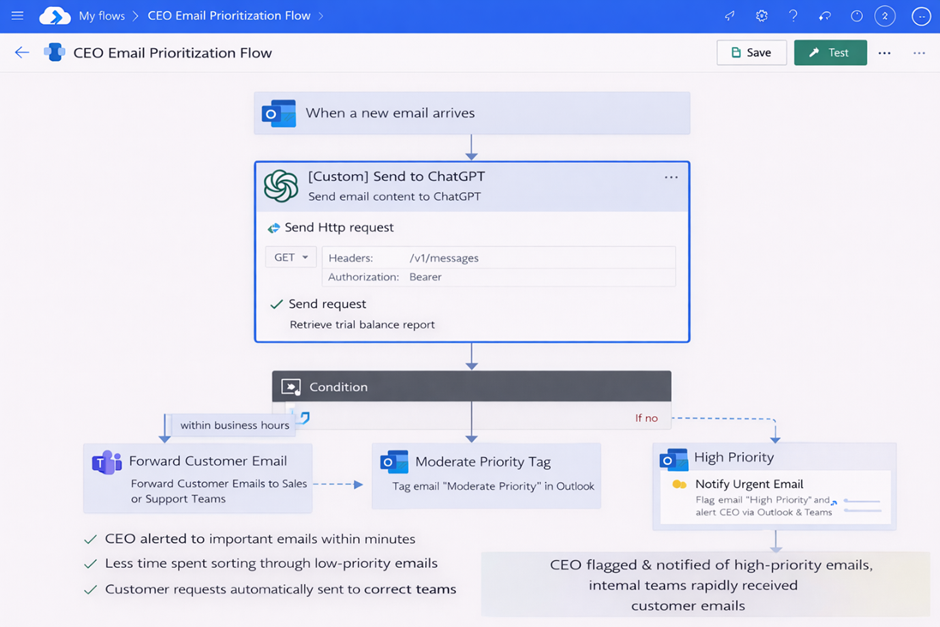
Why it needs a consultant: Calling external APIs from Power Automate requires HTTP connectors, authentication handling, and response parsing that goes beyond the standard connector library.
For a consulting company running its sales pipeline in Nutshell CRM, there was no out-of-the-box Power Automate connector, so common CRM operations could only be reached through raw HTTP requests. Our workflow automation consultants built a Power Automate custom connector that authenticated with the Nutshell API and exposed its operations – People, Companies, Opportunities, Activities and supporting data – as ready-to-use actions, along with business event triggers that fired whenever a new contact or opportunity was created. Users could then build flows against Nutshell directly, without touching HTTP requests.
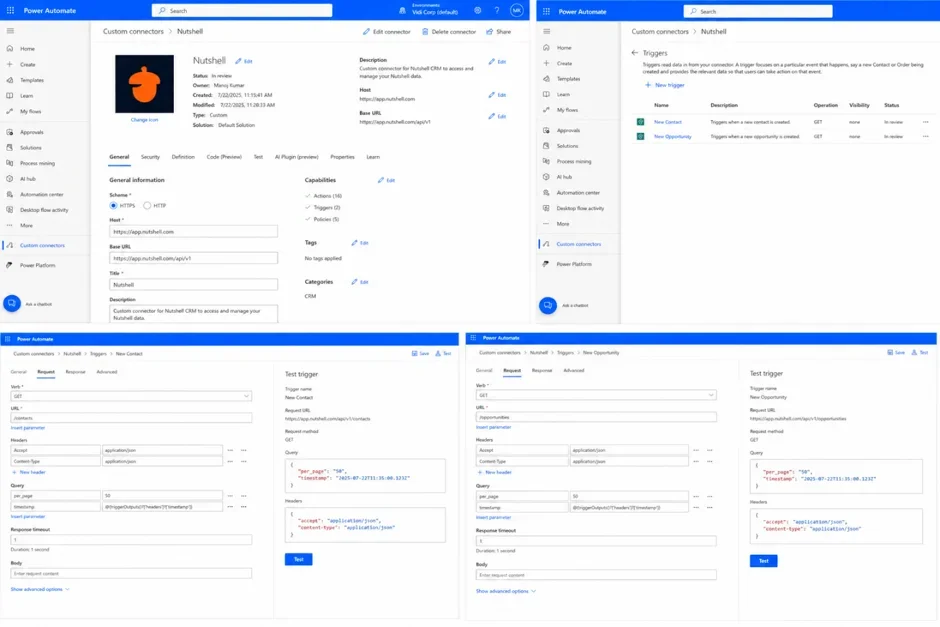
Why it needs a consultant: Building and registering custom connectors requires API documentation, authentication setup (OAuth or API key), and connector definition files that are outside standard Power Automate tooling. Endpoint paths also need checking against your actual API version rather than the public docs, since the two can differ.
A client needed to track regularly updated data from a public website and consolidate it into Excel for reporting. Manual copy-paste was inconsistent and unmanageable at scale. We automated the full process of web scraping using Power Automate Desktop: the bot navigated the site, extracted the required data, and stored it in a structured SharePoint file on a schedule, with error handling and failure notifications built in. Manual data collection dropped by over 80%.
Why it needs a consultant: Web scraping with PAD requires building reliable UI selectors, handling dynamic page content, and building error recovery logic — all of which break frequently without careful design.
The Power Automate examples in this article show how the biggest gains come from applying automation to real business processes, not generic workflows.
If you’re considering Power Automate for your organisation, the key is designing flows around your systems and objectives. If any of these examples resonate, contact us, and the Power Automate consultants at Vidi Corp will help you design and implement a solution tailored to your business.
The best Power Automate examples for beginners are simple workflows that connect tools people already use every day, such as Outlook, SharePoint, Teams, Microsoft Forms, Planner, OneDrive, and Excel.
Good beginner examples include saving email attachments to SharePoint, sending a Teams message when a form is submitted, creating a Planner task from an Outlook email, sending reminders before a due date, and adding form responses to an Excel table.
These examples are a good starting point because they are easy to understand, solve real problems, and do not usually require complex setup.
Common Power Automate examples for business include approval workflows, invoice processing, employee onboarding, document generation, customer feedback routing, contract renewal reminders, CRM follow up tasks, Teams notifications, Power BI alerts, and file management workflows.
For example, a finance team might use Power Automate to capture invoices from a shared mailbox, save them to SharePoint, send them for approval, and notify the right person in Teams. An HR team might use it to create onboarding tasks when a new starter form is submitted.
The most useful business examples are usually the ones that remove repeated admin work, reduce delays, and make it easier for teams to track what is happening.
Yes, Power Automate can work with both Excel and SharePoint. This is one of the most common ways businesses use it.
For example, Power Automate can add a new row to an Excel table when a Microsoft Form is submitted, update a spreadsheet when a request is approved, or move data from Excel into a SharePoint list.
With SharePoint, Power Automate can create list items, update records, save files, copy documents, send approval requests, and notify users when something changes. This makes it useful for document management, request tracking, approvals, reporting, and team processes.ing websites for customers, partners, or the public).
A simple Power Automate approval flow could start when someone submits a purchase request through Microsoft Forms or adds a new item to a SharePoint list.
Power Automate can then send the request to a manager for approval. The manager receives an approval notification in Teams, Outlook, or the Power Automate Approvals app. Once they approve or reject the request, the flow updates the SharePoint item and sends a confirmation message to the person who made the request.
This helps replace long email threads with a clearer process where each approval has a status, timestamp, and record.
Power Automate is mainly used to automate cloud based workflows between online apps and services. For example, it can connect Outlook, SharePoint, Teams, Forms, Planner, Dataverse, Dynamics 365, and many other online systems.
Power Automate Desktop is used for desktop automation. It can interact with applications, websites, files, folders, and older systems by using screen actions, clicks, keyboard inputs, and data extraction.
A simple way to think about it is this: use Power Automate when the apps can connect online, and use Power Automate Desktop when the task depends on a computer screen, legacy software, or a system without a modern connector.
Most basic Power Automate examples do not require coding. Many flows can be built using triggers, actions, conditions, approvals, and templates inside the visual flow designer.
For example, you can build a flow that saves email attachments to SharePoint, sends a Teams message, or adds a form response to Excel without writing code.
However, more advanced flows may need expressions, formulas, JSON handling, API calls, or custom connectors. Coding is not always required, but technical knowledge can be useful when a flow needs complex logic, error handling, data transformation, or integration with external systems.
The cost of building a Power App depends on the size and complexity of the app. A simple app with a few screens and basic workflows will cost less than a business critical app with integrations, permissions, dashboards, and complex automation.
Power Apps is used to build business apps, forms, dashboards, and user interfaces. It gives users a place to enter information, view records, complete tasks, and interact with business data
Power Automate is used to automate workflows between apps and services. It can send notifications, trigger approvals, update records, create tasks, move files, and connect different systems together.


