
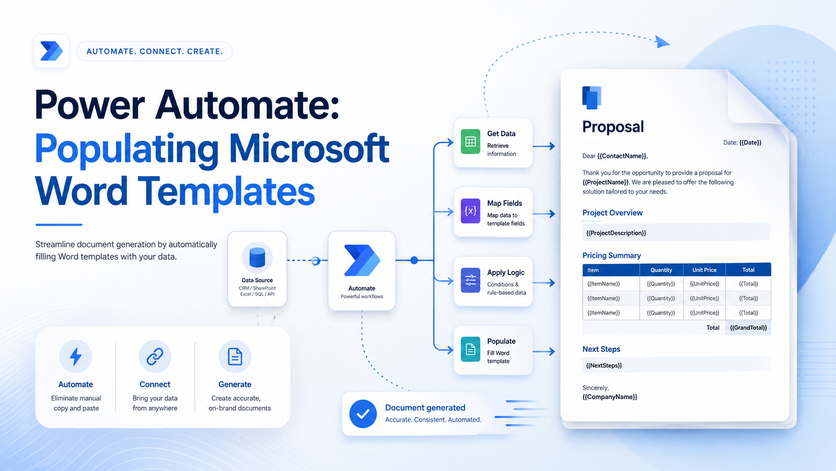
Power Automate can do some pretty cool things – like taking data from Microsoft Forms, SharePoint lists, Excel, Power Apps, Dataverse and loads of other business systems and plugging it straight into a Microsoft Word template. This is a real timesaver for churning out standard reports like audits, proposals, contracts and whatnot.
As Power Automate consultants we’ve worked on over 200 automation projects, spanning a huge range of Power Automate use cases – and one of the recent ones that caught my eye was a document generation project that saved an engineering consultancy a whopping 80 working hours per week.
This guide will walk you through setting up a Word template, linking it to Power Automate, mapping out dynamic data and actually generating the finished document. If you’re feeling brave, you can try to build this yourself – or if you’d rather have us do the heavy lifting, we can build a production-ready workflow for your organisation.
So you might be wondering – what exactly does “populate a Microsoft Word template” do? Well, in the Word Online (Business) connector, it’s just an action that lets you insert dynamic values into all the pre-defined content controls inside a Word doc.
The data can come from all sorts of places – like Microsoft Forms, SharePoint, Excel, Power Apps, Dataverse, APIs and loads of other Power Automate connectors. And the finished document can contain all sorts of fun stuff – like text, dates, numbers, images and even repeating table rows.
Here’s how a typical flow works:
You can even – and this is just a fancy feature – create dynamic file names based on the client, document type, project ID or even the date you generated it.
To be honest document automation is just a no-brainer. It saves you the hassle of copying and pasting the same information into standard reports over and over again. Power Automate goes off and retrieves all the relevant data, maps it to the right fields and produces a nice, neat document. Document generation is a frequent request for our workflow automation consultants, usually as the final step in a larger flow.
The best Power Automate example of this is our recent project with Lift Consultancy, a UK engineering consultancy. Their engineers were spending hours transferring information from iAuditor into Word reports. But after we connected iAuditor to SharePoint and built some Power Automate flows to populate standardised Word templates, they suddenly had a load of extra time on their hands. We’re talking over 80 working hours a week – that’s a whole lot of extra time for the business to focus on other things.
Just to set up this whole thing, you’ll generally need:
The thing is, Power Automate doesn’t automatically pick up on placeholders like <Client Name> or [Invoice Number]. Instead it looks for Word content controls – which basically identify where you want to put the dynamic bits.
You need to set up these content controls in the desktop version of Microsoft Word, as Word Online just won’t give you the same level of flexibility.
First, you need to get to the Developer tab:
Now you can use Word as normal – just a normal DOCX with your logos, headers, footers, fonts, tables and standard wording. Then add the Word content controls wherever you need Power Automate to fill in the gaps.
Don’t worry, the file can still be a standard .docx – you don’t need to convert it to .dotx to get it to work with the Word Online connector.
You can either start with a blank document or use an existing one – just be sure to replace the bits that need to be dynamic with the correct content control.
Common types of content controls include:
Adding a plain text control is pretty straightforward:
The Word Online (Business) connector needs the template to be stored in a cloud document library that it can get to. That usually means OneDrive for Business, SharePoint Online or a Microsoft 365 Group document library.
Just upload your completed DOCX and check that you can open it in Word Online. That way you know the file location and permissions are set up right for your account.
When you come to configure the flow, just browse to the location and file name – don’t try to construct the URL yourself.
Consider enabling document versioning while you’re at it. If you need to make changes to the template later, test the new version before replacing the production file – because if you rename or delete any controls, it can break the mapping.
The pattern is pretty simple:
In our example – the Lift Consultancy workflow – iAuditor sent new survey entries into a SharePoint list and that triggered the flow.
The flow brought in data from all sorts of places:
Power Automate stored the values in variables, which made it a lot easier to clean, format, re-use and map the data later in the flow.
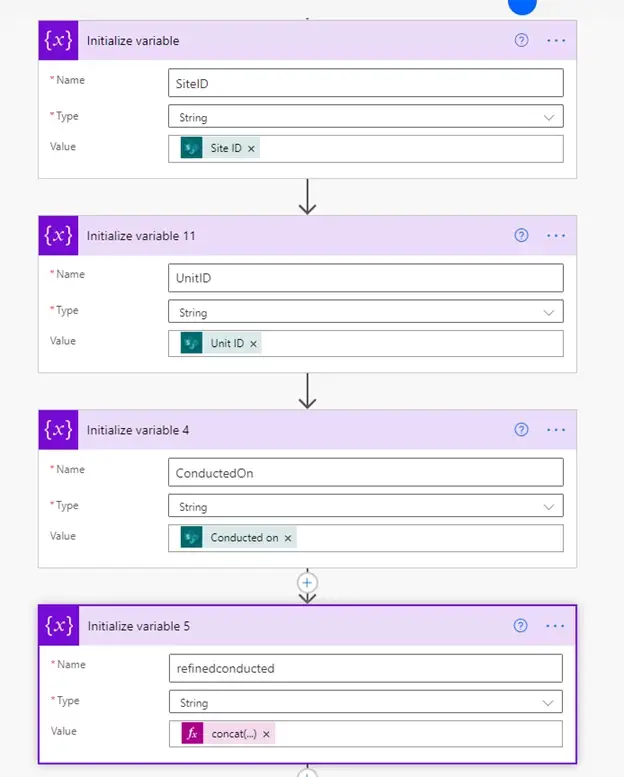
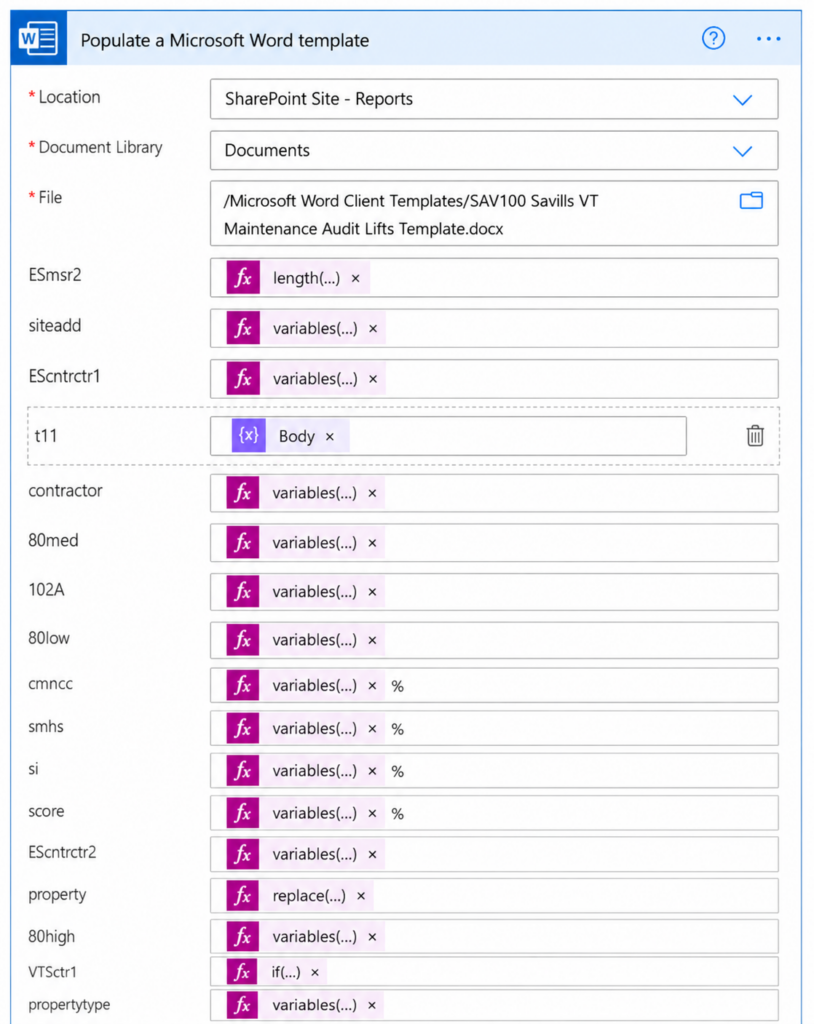
Next, you add the Populate a Microsoft Word template action from the Word Online (Business) connector.
Choose:
And then Power Automate will read the content controls in the file and display them as fields in the action.
Here’s where you connect the dots between the data and the content controls in your Word template.
Each content control title will appear as a separate input – so just select the corresponding dynamic value, expression, variable or action output for each one.
For example:
When the raw source value isn’t suitable for the document, you need an expression to format it in a way that makes sense.
For example, to format a date as the 14th of July 2026, you’d use an expression like this:
formatDateTime(triggerBody()?['InspectionDate'],'dd MMMM yyyy')[
You can use expressions to format numbers, combine different fields, get rid of unwanted characters, or substitute missing values with some default text.
When it comes to picture controls, you need the actual file content rather than the file name or URL. To get the binary content first, use an action like Get file content, then map its output to the picture field.
Word doesn’t always resize images inserted automatically. If you need the pictures to resize properly, set the picture control size in the template, and pre-size any source images where you can.
The population action gives you document content, but it doesn’t automatically save the finished file. Add a Create file action from SharePoint or OneDrive for Business to save it.
Configure:
A clear file name might look something like this:
Audit Report – Client Name – Project ID – 2026-07-14.docx
Use an expression if you need to:
concat(
'Audit Report - ',
variables('ClientName'),
' - ',
variables('ProjectID'),
' - ',
formatDateTime(utcNow(),'yyyy-MM-dd'),
'.docx'
)[
To create a PDF, add Convert Word Document to PDF after you’ve saved the DOCX. You can then store it in the right library, or use it as the email attachment.
Add Send an email (V2) to deliver the document straight to Outlook. The recipient, subject, body, and attachment can all use dynamic values.
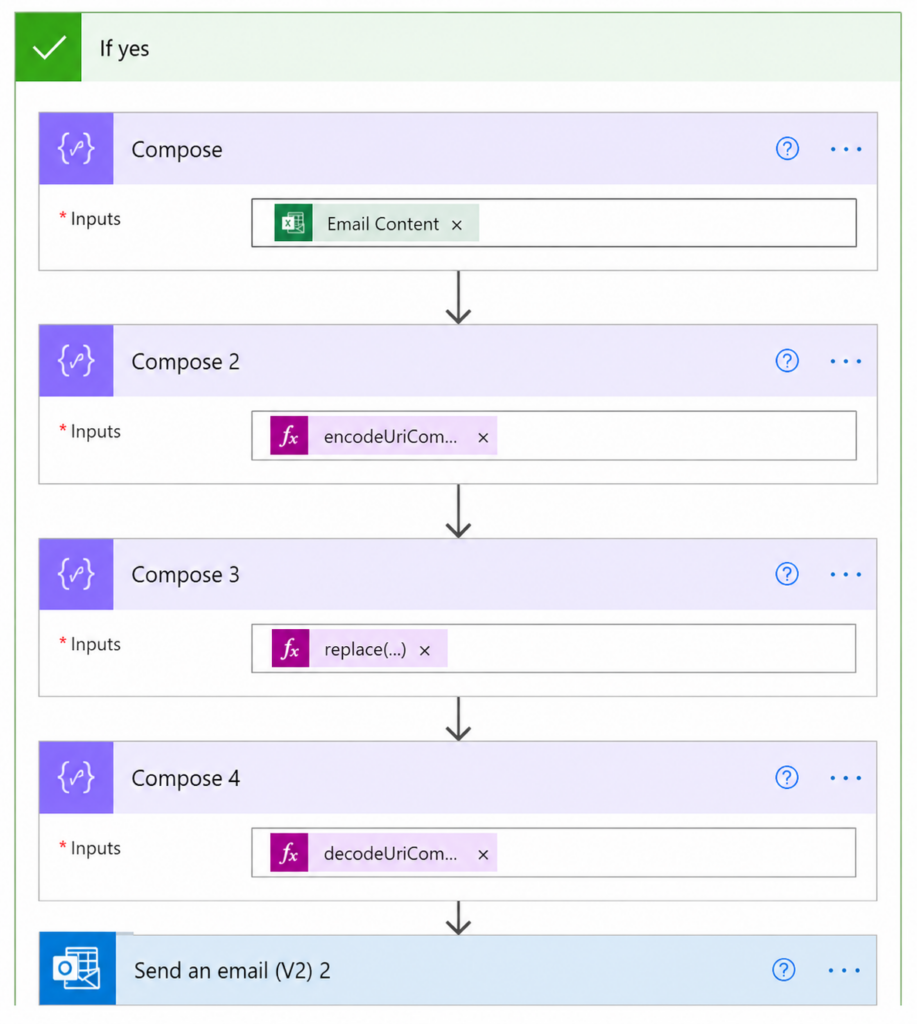
When we were automating the process for Lift Consultancy, we stored the email wording in Excel. The flow would then retrieve this, replace some placeholders with project variables, and send the finished message off to the client.
Finally, write the generated file URL back to SharePoint or Dataverse, so the users have a direct link to the latest document and so it creates a basic generation log.
When the document has a variable number of rows you need repeating sections. This could be inspection findings, invoice lines, employees, project activities or loads of other things.
In the Word template:
1 . Insert a table.
2. Create a header row with some fixed labels.
3. Add in one example record.
4. Insert a plain text content control into each cell, and give each one a unique name.
5. Select the example row.
6. Wrap it in a Repeating Section Content Control.
In Power Automate, you need to get the records with an action like Get items, or List rows present in a table, and then you use Select to turn the records into an array with property names to match the controls in the repeating section.
For example:
[
{
"Finding": "Emergency lights failed",
"Location": "Third floor",
"Priority": "High"
},
{
"Finding": "Missing inspection label",
"Location": "Plant room",
"Priority": "Medium"
}
][
Map this array to the repeating-section field. Power Automate will then create one Word table row for every record.
Don’t go trying to use nested repeating sections, or large tables because it’ll just increase processing time and file size, test it with a realistic number of records rather than just a sample.
The Word Online (Business) connector is pretty good for structured documents, but it has its limits. Rich text controls aren’t supported in the same way as plain text, image resizing is limited, and very big documents may hit connector or performance limits.
Instead of passing formatted HTML into a field, use Word styles for headings, fonts, colours, and spacing. Get your images pre-sized before the flow inserts them, and if you have an exceptionally long report, split it into separate documents.
To keep your flows maintainable:
Use Power Automate scopes to create a basic Try/Catch structure. Configure the error scope to run when document generation fails, then send a notification containing the source record ID and flow-run link.
Always test the finished document, rather than just checking whether the flow reports a successful run. A technically successful flow can still produce missing text, cropped images, blank tables or an incorrect file name.
Creating a Basic Document Flow is pretty straightforward once you’ve got a single data source and just a handful of text fields to deal with. But then you get into Production and things get a lot more complicated – you’ve got multiple systems to work with, images to include, calculations to crunch, sections that need to be repeated, permissions to sort out, and then there’s error handling, PDF conversion, and automated delivery to worry about on top of all that.
Vidi Corp can wrap up an entire process around your existing documents and systems for you though. Get in touch and hire Power Automate developers to create a custom Power Automate flow that’ll not only generate your Word documents but also store them, convert them into whatever format you need, and then send them out automatically.


