
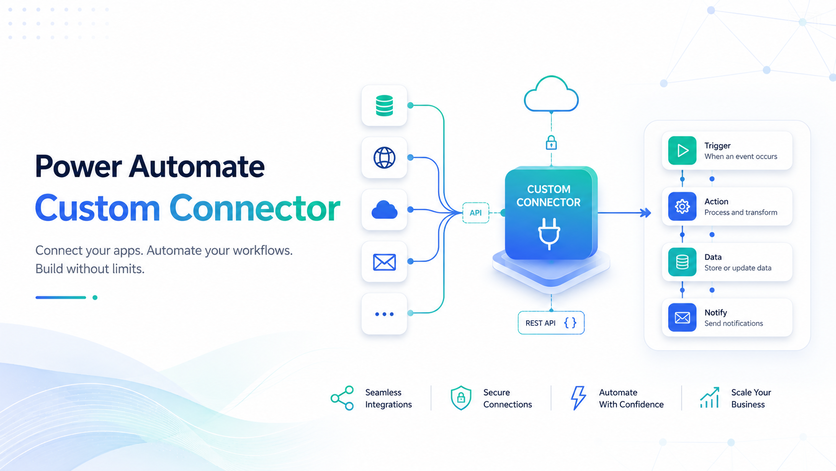
You want Power Automate to talk to a CRM, ERP, SaaS platform, database, or internal system through its API, but no good standard connector is available. So you start playing around with HTTP requests, API keys and JSON payloads – one or two might work quickly, but turning them into a reliable integration with secure authentication, reusable actions, structured outputs, pagination, triggers and error handling is a whole different story.
At Vidi Corp, our Power Automate consultants have delivered over 200 automation projects. In this article, we’re going to show how to turn API operations into practical Power Automate actions and triggers using a custom connector to the Nutshell CRM.
A Power Automate custom connector is a tidy little interface between Power Automate and an API that doesn’t have a standard Microsoft connector to call its own.
Microsoft describes custom connectors as a neat wrapper around an API, exposing its own actions and triggers. The same connector can also be used in Power Apps and other suitable Power Platform products.
A custom connector can do all of the following:
Without a connector, a flow builder might need to configure a URL, HTTP method, headers, authentication and JSON body each and every time they create a record from scratch.
With a connector, they can just select an action like Create Person and fill in the fields for first name, last name, email address and phone number. The connector handles all the technical API operations in the background. This is one of the classic advanced Power Automate use cases.
There are so many industry-specific and internally developed systems that don’t come with standard Power Automate connectors.
A custom connector makes the API available to cloud flows, so flow builders don’t have to recreate the integration every single time.
Some common examples include:
The connector doesn’t replace either system. It creates a controlled route through which they can exchange data.
Most integrations just need a small number of repeatable operations, like retrieving a record, searching a collection, creating or updating a record, or responding when something changes. A flow can then use the returned data to continue a process in another platform.
For instance, a flow could detect a new CRM opportunity, grab its company and contact details, create an order in an ERP and then notify the operations team in Microsoft Teams.
We’ve even had success with bigger API integration projects, like connecting six systems to one central database through secure REST API feeds. Our client reported a 95% reduction in manual data consolidation, an 80% reduction in data-entry errors, and a reduction in report-generation time from 48 hours to under five minutes.
An API may present an operation as: POST /people
But a well-designed connector can present it as: Create Person
And it can also provide labels, descriptions, required-field validation, dropdowns, default values, and structured outputs. Users get to work with familiar business terms, not headers, endpoint paths or JSON payloads.
Software vendors can create connectors that let customers use selected product capabilities through Power Automate. For example, our RPA consultants created a Power Automate custom connector for Epicor which they then offered to their customers who use their ERP.
The connector provides consistent authentication, actions, inputs and outputs. This makes the API easier to use and reduces the need for repeated one-off integrations.
The standard HTTP action might be sufficient for a proof of concept, one temporary request or a narrow internal flow. But a custom connector is usually a better choice when the integration needs to become a reusable business asset.
| Direct HTTP action | Custom connector |
| Useful for testing one request | Designed for repeated use |
| Configuration sits inside each flow | API configuration is centralised |
| Users work with URLs, headers, and JSON | Users select named actions |
| Outputs may require manual parsing | Outputs appear as dynamic content |
| Changes must be repeated across flows | Connector updates standardise behaviour |
| Best suited to technical users | More accessible to business users |
Still unsure whether you need an HTTP action or a custom connector?
Send us the API documentation and a short description of the process. We can help you figure out the simplest suitable approach.
In a recent development project, our workflow automation consultants created a Nutshell CRM connector for a consulting company. The purpose of the Nutshell connector was to bring common CRM operations right into Power Automate without forcing users to mess around with HTTP requests.
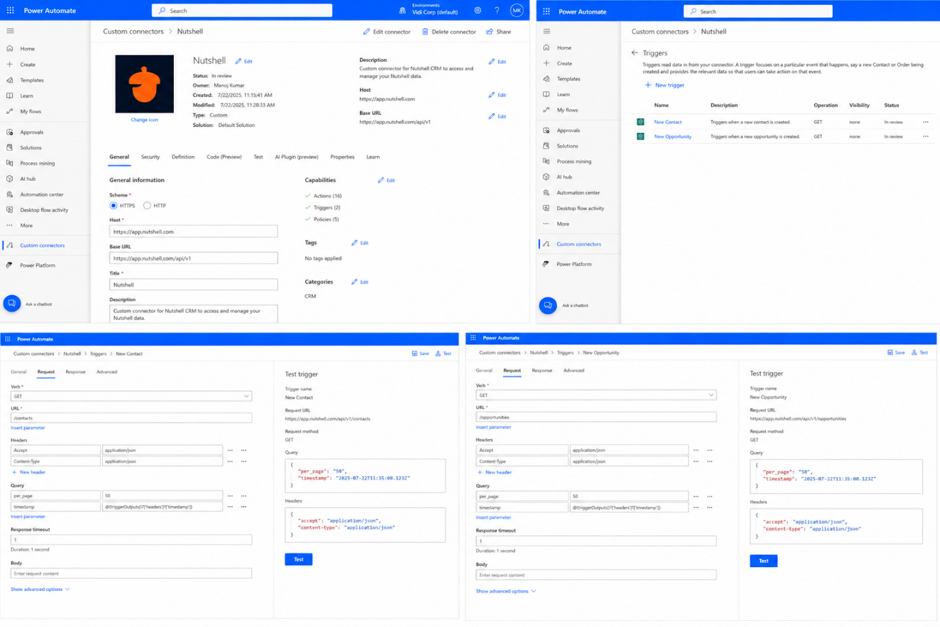
The connector organised its operations into:
The project connector used a base path of /api/v1 and operations like /people. However, Nutshell’s public REST documentation currently uses paths such as /rest/contacts, which describes contacts as the records called “People” in the Nutshell interface.
Just use the endpoints in your API version, rather than copying paths from the public docs without checking for any changes.
First, it’s not about opening up the custom connector wizard, it’s about deciding which bits of the API are actually useful for getting the job done.
For Nutshell, the main objects were:
Take a closer look at your system and list off the main business nouns. Now decide what Power Automate needs to do with each one:
That becomes your connector’s initial operation inventory.
Each connector action usually corresponds to an API request.
Nutshell’s People operations are a good example to look at.
List People
The operation included query parameters such as:
Pagination needs to be tested carefully – a request that returns only the first page can look like it’s working fine while leaving out most of the records.
Get Person
The person ID is a path parameter because it identifies the record.
An optional include value is a query parameter because it changes or expands the data that gets returned.
Create Person
The request is made with JSON headers such as:
Accept: application/json
Content-Type: application/json
And the request body is where you stuff all the inputs – but this time in a format the API actually expects:
{
"first_name": "<first name>",
"last_name": "<last name>",
"email_addresses": [
{
"email": "<email address>",
"type": "work",
"primary": true
}
],
"phone_numbers": [
{
"phone_number": "<phone number>",
"type": "work",
"primary": true
}
]
}
The Power Automate user gets to see nice, simple fields like First Name, Last Name, Work Email, and Work Phone. But behind the scenes, the connector is building the nested arrays and JSON payload. The user doesn’t have to know the API’s data structure.
Update Person
The operation includes the person ID in the URL and sends off the changed fields to the existing record.
Just be aware of how the API treats missing or empty fields – some APIs leave them alone, while others might do something different with them.
The People actions set up a repeatable CRUD pattern.
Companies
Opportunities
The connector also included actions for activities, tags, and pipelines. And that’s important, because another operation might need some internal ID. For example, Create Opportunity might need a pipeline, stage, owner, tag or related company.
A flow can run List Pipelines, find the right record, and then pass its ID into Create Opportunity.
The user creates a connection in Power Automate, and provides the required credentials. Power Automate then stores the connection details and applies them to each request.
The flow builder doesn’t need to insert credentials into every action.
Common authentication methods include:
Nutshell’s current API documentation has the following authentication requirements – its APIs use HTTPS and HTTP Basic authentication, and you need a user email address and an API key to get past that. Make sure your API version is all set up with the right authentication configured. Don’t skip this step.
Before proceeding, just test authentication out to make sure you’re good to go. You can use Postman, Insomnia, an interactive API doc, or even just curl to confirm that your credentials and endpoint are working properly – and all without having to get into Power Automate.
Important: use a restricted test account and non-production data only. Don’t paste any production secrets, personal info or confidential payloads in there – nor unredacted logs to a public AI assistant. That’s just not good.
You’ve got a few options here.
Import an OpenAPI Definition
If the provider has given you a reliable Swagger or OpenAPI file that you can import, that’s probably the easiest route. The file can define endpoints, methods, parameters, request bodies, responses and authentication – but still make sure you review and test it.
Import a Postman Collection
If you and your team have already tested and saved the API requests in Postman, you can use that to import the definition. The Postman collection can give you working endpoints, parameters, request bodies and response examples – just be sure to check them out.
Create the Connector From Blank
Use this route if the docs are incomplete, or only a few endpoints are needed. Maybe the API needs manual interpretation – or the team wants full control over the action design. That’s a more involved process, but sometimes it’s the right choice.
When I set up the Nutshell connector, I made the following decisions:
And remember – don’t publish security settings or credentials, and don’t publish unapproved security configurations.
Just having a technically working endpoint isn’t enough. Flow builders need to know what each operation does, and what information it needs.
For example, an API might use assignee_user_id, but a connector could display Assigned Employee instead. Use terminology that people already know – and Power Automate needs to understand the API response before returned values can show up as dynamic content.
For example, a Create Person response might have:
All of these outputs can then be used in later actions. For example:
To draft a response schema, run the request outside Power Automate and save a successful response. Remove confidential data and test the schema against records containing optional, missing, empty and null values.
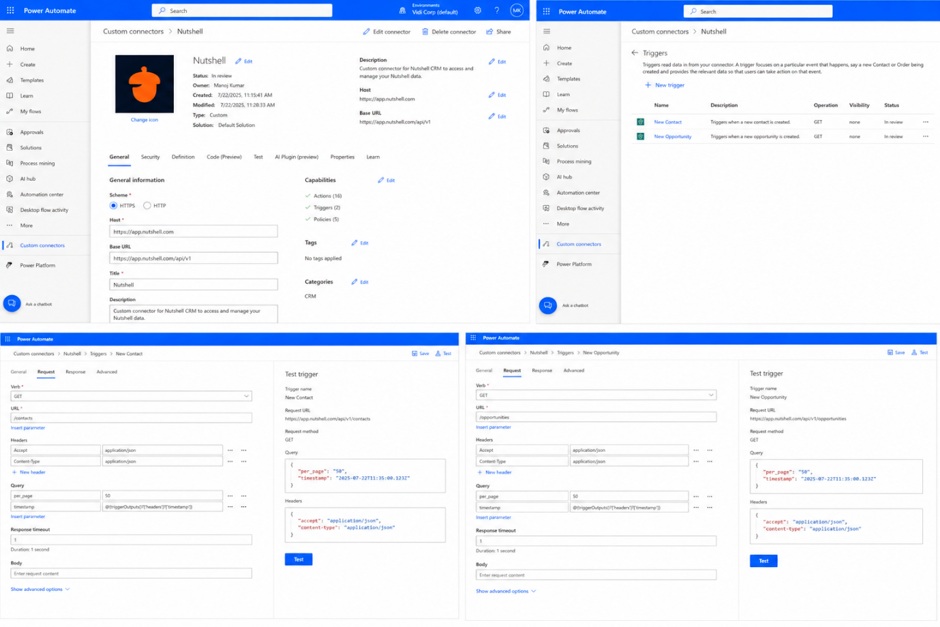
Triggers start the flow itself, whereas actions are started by a flow. The Nutshell connector came with a few pre-built triggers – such as
These were all polling triggers – which means Power Automate periodically checks if new records have appeared since the last check. To do this, it needs to pass a timestamp or state value to the API, and then the connector needs to store the updated state for the next request.
But a webhook works differently – the external system sends an event notification when something happens, so the flow doesn’t need to keep checking.
You should use a webhook when the API supports reliable event subscriptions – otherwise, go with polling.
Either way: check API rate limits, prevent duplicate records, test several records between checks, define retry behaviour and store stable external record IDs.
Nutshell also supports outbound webhooks – and its docs recommend treating the webhook as a notification that an entity has changed, and then retrieving the full record through the API.
Test each operation separately before you combine them into a single flow.
Here’s a practical sequence:
Include scenarios like invalid credentials, missing fields, invalid IDs, null values, rate limits, timeouts and different response structures.
A connector is not ready for production just because one thing works in the test environment – it’s ready when successful and unsuccessful requests all give you controlled, understandable results.
Want us to look at a connector that only kind of works? We can review the existing definition, Postman collection, schemas and flows for you, without having to start over from scratch.
This example shows how the actions in the Nutshell connector can be used to support a wider business process.
Trigger: New Contact Created
The flow starts when the connector detects a new Nutshell contact.
Retrieve the Complete Record
The flow passes the returned ID into Get Person to retrieve the complete record.
When a company ID is available, Get Company retrieves the related organisation.
Decide Whether to Create an Opportunity. A Power Automate Condition can check whether the contact was sourced from somewhere, is a Lead, is assigned to a particular pipeline, has a specified estimated value, and if an open opportunity already exists for the contact.
Create the Opportunity & Follow Up Activity
The flow then passes the relevant Person ID, Company ID, Pipeline ID, value, owner and notes into the Create Opportunity activity.
The returned Opportunity ID can then be sent into the Create Activity to schedule a follow-up call or task.
Notify the Team
Microsoft Teams can post a message containing the contact’s name, company name, opportunity value, assigned owner, and a link to the CRM record.
The flow can then continue by updating Dataverse, SharePoint, SQL, Outlook, Planner or any other business system you need to integrate.
This is basically the main point of the connector – Nutshell becomes one piece of the jigsaw in a bigger automated process rather than a standalone CRM in its own right.
This Nutshell example can be adapted to work with most any other system that has a usable REST API.
1. Define the Process (First Step)
Start with one business event. This could be:
2. Work out the data you need
Make a note of what starts the process, what system owns the event, what identifiers are returned, where the data needs to go and what should happen next.
3. Pick the relevant Endpoints
Find the minimum number of List, Get, Create, Update, Search and event operations you need to complete the process.
Don’t expose the whole API at this point.
4. Test the Requests
Save any successful requests, response examples, authentication details, pagination rules and common error responses.
5. Get One Complete Process Up and Running
Start with one trigger, one retrieval action, one Create or Update action and one downstream step.
Once that process works, you can start to build additional actions.
AI can speed up individual tasks, but you shouldn’t rely on it to produce a finished production connector from scratch with incomplete documentation.
Some useful tasks include:
Example: Review this API documentation and identify the endpoints needed to list, retrieve, create and update customers. Don’t just guess the answer – only include information that’s actually there.
Any AI-generated output needs to be checked over. It might invent parameters, use the wrong API spec, misunderstand authentication, miss out pagination or make mistakes with optional fields.
Copilot is more useful after the connector is built. It can help create or modify the surrounding cloud flow.
For example: Create an automated cloud flow that starts when a new contact is created in the Nutshell connector. Retrieves the complete person and company records, creates an opportunity, posts a Teams message and creates a Planner task.
Review the actions, connections, record IDs, dynamic-content mappings, conditions, retries and duplicate prevention logic.
Don’t give an AI tool live API keys, OAuth secrets, personal data, customer records, confidential URLs or unredacted logs unless its use has been approved by your organisation. Maintaining API keys within a secure password manager ensures secret isolation prior to automated code reviews.
Need help verifying an AI-generated schema or OpenAPI definition? We can test it against the real API and turn it into a supportable connector.
A demo will just prove that one API request works one time.
A production connector has to do all that AND:
It’s for these reasons that many internal connector projects come to an end.
Authentication might work in Postman but fail in Power Automate. A GET might succeed but a POST request might fail because the API needs the JSON in a certain format.
Values might not appear as expected in dynamic content. Pagination might miss out records or a polling trigger might return the same data over and over.
At this point, the work has shifted from basic flow configuration into actual API integration engineering.
Doing it in-house might be the way to go when the API is small, well documented and only a couple of actions are needed.
You’ll need someone on the team who understands REST APIs and JSON, and time to test and maintain the integration.
Specialist support is usually better when:
A developer can build the connector from scratch, review a part-finished implementation, fix broken actions, add triggers, convert Postman requests, or complete the surrounding flow.
Our developers also have the capacity to build a Power Automate document approval workflow
When it comes to a Power Automate custom connector, it’s not just about slapping together an API test and calling it a day – it’s a reusable integration layer that’s designed to help you connect different systems and processes together.
The example we’ve shown with the Nutshell API is a good illustration of how API resources can be turned into useful actions like List, Get, Create, and Update – and how polling or webhook triggers can get the whole workflow started.
Of course, AI and Copilot can certainly help speed things up, but they’re not a substitute for proper implementation, testing, and technical review.
We’re one of the top 10 Power Automate consultancies, so if you’ve started building a custom connector and are getting stuck, whether that’s down to authentication, schemas, pagination, triggers or testing, send us the API documentation and what you’ve got so far and we’ll do our best to help you get it finished.
Not necessarily – it needs to be reachable, support a compatible authentication method, and expose the right operations. But in many cases, Power Automate can make it work.
If there are network restrictions or weird security requirements in place though, you might need to use an intermediary service to make it work.
An HTTP action just lets you configure the API request right inside a flow.
A custom connector, on the other hand, is a separate entity that holds the API definition – and provides you with reusable actions that have all the inputs and outputs properly defined.
Absolutely – a good Postman collection can be a massive help in getting things started, as long as you’ve got a tested collection with working endpoints, parameters, request bodies and response examples.
But keep in mind that the generated connector will still need some work and testing before it’s production-ready.
No, not at all. You can either import a Postman collection or start from scratch.
Having one of these files will certainly make things easier, but it’s not a requirement.
Copilot can certainly help with the surrounding cloud flow – but it can’t magic up a custom connector for you.
It needs human input to interpret the API, configure authentication, define schemas and test the connector.
With a polling trigger, you’re basically asking the service ‘have you got any new data for me?’ every so often.
A webhook trigger on the other hand is more like ‘do a little dance and wait for the service to send us an event notification’.
Yep. A custom connector can expose API operations to Power Apps as well, as long as you’ve got a suitable Power Apps project in place.
Yes, you can – if you’ve got their existing definitions, Postman requests, schemas and flows, it’s usually pretty straightforward to review and extend what they’ve started.
Well, the chances are that you’re going to need to update the connector to reflect the changes – making sure that things like paths, parameters, authentication and schemas are all updated correctly.
Monitoring the API for changes and testing things regularly should help keep you ahead of the curve.
Yes, they can, and it’s not a bad idea at all, especially if they’re creating a custom connector that exposes a specific set of API capabilities.
Just make sure that the connector is reliable, well-documented and properly supported – and that you’ve got a good plan in place for managing different versions.


