
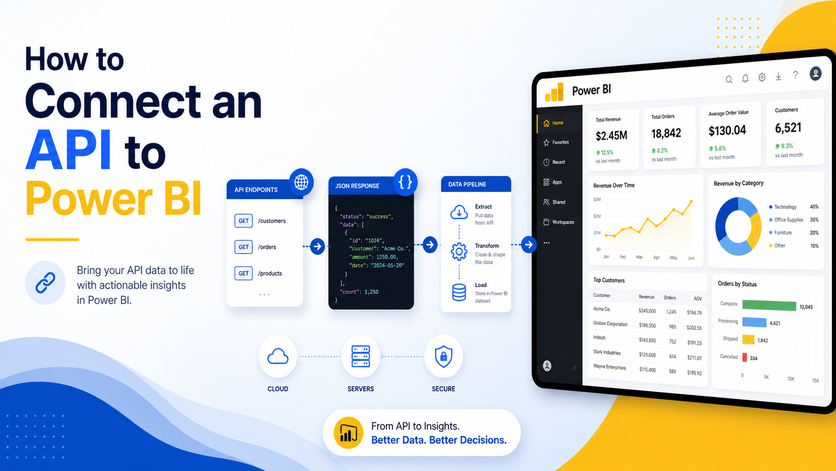
Power BI comes with its own built-in connections for 200+ pretty popular data sources, but sooner or later, you’re going to hit a wall where you need data from somewhere that isn’t on that list. That’s where a Power BI API connection comes in – the way you pull that data into Power BI automatically.
Our Power BI consultants have years of experience building and maintaining API connections into Power BI for our clients, from custom connectors that pull data directly from an API into a Power Query, to full-on data pipelines that suck data into an Azure SQL database. We’ve done this kind of work for teams in finance, retail, manufacturing, and non-profit, using OAuth2 REST APIs, Python, and Microsoft Fabric.
This guide is going to walk you through how Power BI API connections work, based on our recent project where we connected Power BI to the Hootsuite API for a client to get social media analytics. We’ll also touch on the three different ways you can build a connection, and if you don’t feel like building it yourself, we’ve also got pre-built connectors to cover you.
Disclaimer: this guide is quite technical and contains bits of code. If you want to digest this code a bit more easily, copy it from here and paste into ChatGPT, Claude or any other AI model that you are using, asking it to explain it.
If you find this overwhelming, you can engage our API integration consultants on a project basis.
A Power BI API connection is essentially a way for Power BI to grab data directly from an app’s API, and then load it into a report on a schedule. Think of it like this: the API is like a waiter at a restaurant, Power BI makes a request, the API goes off and fetches the data from the source system, and then brings it back to Power BI. Most of the time, it comes back as a JSON file, which you then need to transform into a table with rows and columns.
Every API is different, and each one has its own documentation. When you build a connection, you need to follow that documentation and make sure your requests are formatted in a way the API can understand. Most of the time, this means using Power Query’s Web connector to send HTTP requests with any necessary parameters like headers and bodies.
It’s important to mention that the data inside APIs is split into many different tables. Our job as Power BI developers, therefore, is to research which tables contain the data that we need and then extract them from the API. The next step is building a reliable data model to blend these tables together in a way that ensures data accuracy.
This is what lets Power BI go beyond just static reports and achieve automated business intelligence. With an API connection, you can set up data to refresh automatically, get real-time figures, and even report on data from custom or third-party sources that don’t have a native Power BI connector.
Before you even start trying to connect anything, there are three key concepts you need to get your head around.
Authentication is how the API makes sure you’re allowed to access the data in the first place. Power BI supports a few different authentication methods, and the one you need to use is set out in the API’s documentation.
When Power BI comes asking for your credentials, it usually gives you the option of using Anonymous, Basic, Web API key, and Organizational account. Matching this up with the API’s recommended method is what stops most authentication errors from happening.
Power BI takes the data an API sends back and turns it into tables for you. You’ll probably come across these three formats most often:
A rate limit is like a speed limit for how many requests you can send at a time. APIs set rate limits to prevent them from getting totally swamped, and Power BI can’t do anything to help with this – it’s just up to you to make sure you don’t send too many requests at once and get your API connection shut down.
| API Source | Rate Limit |
| Salesforce | 15,000 API calls per 24 hours per org (varies by edition) |
| Google Analytics | 50,000 requests per project per day; 10 queries per second per user |
| GitHub API | 60 requests/hour (unauthenticated) or 5,000/hour (authenticated) |
| Twitter/X API | 300 requests per 15 minutes for certain endpoints (v2, tier-dependent) |
Managing rate limits means caching results, scheduling refreshes, using pagination, loading data incrementally, or even adding some retry logic. Hitting a limit is a pretty common way to break your API connection at scale.
In one of our recent projects we helped a company called Integrity Landscape, a commercial landscape management firm, overcome a 1,200-request API limit and got them down to a sub-three hour refresh cycle
The best way to get a handle on Power BI API connections is to show one in action. Our business intelligence consultants did this for a client recently by connecting the Hootsuite API to Power BI to pull organic social media analytics into a reporting dashboard.
Hootsuite, unfortunately, doesn’t have a Power BI connector built in, uses OAuth2 authentication, and returns paginated data from a POST endpoint – the kind of realistic business API we all have to deal with, not some public demo URL you find online.
To speed up the build process, our developer made use of an AI coding assistant – pasted the API specification into Claude, the AI coding assistant, to generate and debug the Power Query code. The pattern below can be applied to just about any OAuth2 API you need to connect next.
Before you write any code, you need to find the API’s OpenAPI (Swagger) specification file. This is a YAML or JSON file that formally outlines every single endpoint, parameter, response field, and authentication requirement. It is, without a doubt, the single most valuable document for building an accurate connection – well worth tracking down.
Most documentation sites load this spec file from behind the scenes. Try the common paths in your browser first, e.g.
https://apidocs.example.com/openapi.json
https://apidocs.example.com/swagger.json
https://apidocs.example.com/openapi.yaml
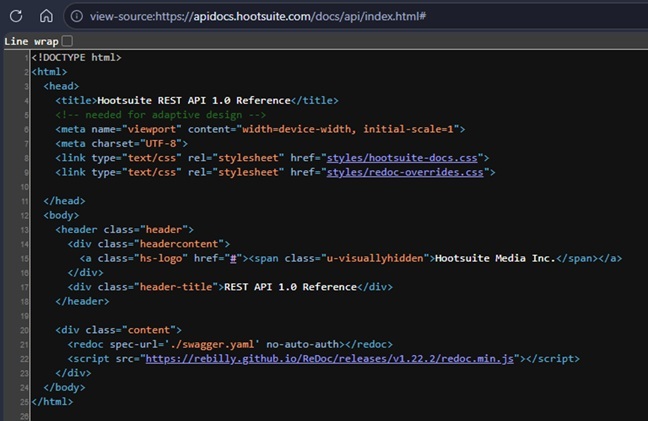
If none of these return anything useful, take a look at the page source of the docs and look for a spec-url= or url: attribute – some Swagger UI and Redoc setups embed the spec location there.
<redoc spec-url='./swagger.yaml' no-auto-auth></redoc> For Hootsuite, this revealed two separate spec files: one for the Publishing API (posts, profiles) and one for the Analytics API (metrics). Some platforms also publish their spec on GitHub, so a search “site:github.com [platform name] openapi spec” is often the fastest route to finding it.
This is where things get a lot easier. Instead of reading documentation and writing M code from scratch, just give the spec file to an AI assistant and describe what you need. It reads the authentication flow, endpoint structure, and required fields, then writes a first version of the Power Query code.
I’m building a Power Query (M language) connection to the Hootsuite API in
Power BI / Dataflow Gen2. I’ve attached the OpenAPI spec.
I have these credentials stored in a _Config table:
- hs_client_id

  - hs_client_secret

  - hs_member_id
I need a query that:
1. Fetches an OAuth2 token using the member_app grant type
2. Calls /v1/analytics/posts for profile ID 92173569
3. Handles cursor-based pagination
4. Returns a flat table with created_at, post_id, impressions, clicks
The key here is to give it the actual spec file, not a description of the API. That precision produces far more accurate code than some informal description.

The first version of the code will probably hit an error when you run it – and that is normal. Paste the exact error message back, and the assistant diagnoses the cause and corrects the code. This loop – paste code, run, paste the error back – is the core workflow, and most of the time a typical integration reaches a working query in just three or four iterations.
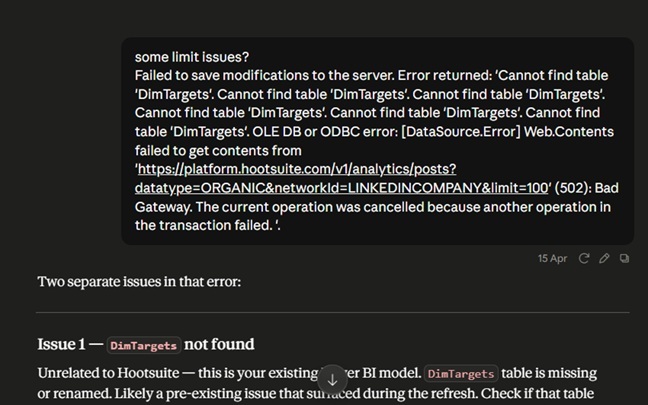
Hootsuite uses OAuth2 with a server-to-server grant type, which means our credentials are used directly without any browser redirects – which is perfect for scheduled Power BI refreshes.
Hootsuite access tokens expire after an hour according to the Hootsuite API documentation. Instead of storing a token and then refreshing it on a schedule, a cleaner pattern is to fetch a fresh token inline at the top of every query. The token is used immediately and never persists between refreshes, so it can never go stale.
Power Query M — token fetch
let
    // Read credentials from _Config table
    client_id     = _Config[hs_client_id]{0},
    client_secret = _Config[hs_client_secret]{0},
    member_id     = _Config[hs_member_id]{0},

    // Base64-encode client_id:client_secret for Basic auth header
    encoded = Binary.ToText(
        Text.ToBinary(client_id & ":" & client_secret),
        BinaryEncoding.Base64
    ),

    // Fetch token — inline on every refresh
    token_response = Json.Document(
        Web.Contents(
            "https://platform.hootsuite.com",
            [
                RelativePath = "/oauth2/token",
                Headers = [
                    Authorization   = "Basic " & encoded,
                    #"Content-Type" = "application/x-www-form-urlencoded"
                ],
                Content = Text.ToBinary(
                    "grant_type=member_app"
                    & "&member_id=" & member_id
                    & "&scope=analytics%3Aread"
                )
            ]
        )
    ),
    access_token = token_response[access_token],[
There is a single rule that prevents most credential problems: always use the RelativePath option in Web. Contents; don’t use a full URL as the first argument. Power BI binds credentials to the base URL. If you embed a dynamic value like a date or a cursor in a full URL string, Power BI will treat every variation as a new data source and re-prompts for credentials, which breaks scheduled refresh.
Power Query M — RelativePath pattern
// ❌ Breaks on scheduled refresh when URL contains dynamic values
Web.Contents("https://platform.hootsuite.com/v1/analytics/posts?limit=100", [...])

// ✅ Base URL is static; dynamic parts go in RelativePath or Query record
Web.Contents("https://platform.hootsuite.com", [
    RelativePath = "/v1/analytics/posts?limit=100",
    ...
])[Before you build the full query, make one minimal call to confirm the connection works and to see what the response actually looks like. A single-page call is so much easier to debug than a complete query.
The Analytics API requires internal Hootsuite profile IDs – not your social network page IDs. These come from the Publishing API.
We will therefore need to fetch the profile IDs first and pass them as parameters for our next API request.
Add a simple HS_SocialProfiles query to retrieve them:
Power Query M — HS_SocialProfiles
let
    // ... token fetch from Step 3 ...

    raw = Web.Contents("https://platform.hootsuite.com", [
        RelativePath = "/v1/socialProfiles",
        Headers = [ Authorization = "Bearer " & access_token ]
    ]),

    result = Json.Document(raw)[data],
    table  = Table.FromList(result, Splitter.SplitByNothing()),
    expand = Table.ExpandRecordColumn(table, "Column1", {"id", "type", "network_id"})
in
    expand
Note the difference between id and network_id in the output. The id column is what you pass to the Analytics API’s profileId filter. The network_id is your social network’s own page identifier — a different thing entirely.
Finding this too technical? Contact us to configure your API connection!
The networkId query parameter (note: different from the response field) takes a string enum value from the spec — not any numeric ID:
| networkId value | Platform |
| LINKEDINCOMPANY | LinkedIn Company page |
| FACEBOOKPAGE | Facebook page |
| Twitter / X | |
| INSTAGRAMBUSINESS | Instagram Business |
When the data loads, it often arrives as a JSON file wrapped inside records and lists rather than as a flat table. In Power Query, you expand these using the little expand icon on the column header, choosing the fields you want. This one step is where many first-time connections stall, so slow down and make sure you get this right.
The Analytics API differs from the Publishing API in a few important ways that the spec makes clear. Understanding these upfront prevents the most common errors.
Three things the spec tells you:
1. POST, not GET. The analytics endpoints use POST with a JSON body, not GET with query parameters. The filter criteria go in the request body.
2. The filters wrapper. This is the most common source of 400 errors. The spec defines the request body as:
ListPostsRequest:
  required:
    - filters
  properties:
    filters:
      $ref: "#/components/schemas/RequestFilters"
Every filter property must be nested under a “filters” key. Sending them at the top level returns a 400 with a message that is easy to miss if you do not capture the raw response body.
3. Metrics are dynamic. The response returns metrics as a key/value map where the available field names vary by date range and network. You cannot declare fixed column names in advance — you have to collect the distinct field names across all rows before expanding.
The complete analytics query:
Here is the full query Claude generated for pulling post analytics, incorporating all of the above:
Power Query M — HS_Analytics_Posts (complete)
let
    // === Credentials from _Config ===
    client_id     = _Config[hs_client_id]{0},
    client_secret = _Config[hs_client_secret]{0},
    member_id     = _Config[hs_member_id]{0},
    date_from     = _Config[date_from]{0},

    // === Token fetch ===
    encoded = Binary.ToText(
        Text.ToBinary(client_id & ":" & client_secret), BinaryEncoding.Base64),
    token_response = Json.Document(Web.Contents("https://platform.hootsuite.com", [
        RelativePath = "/oauth2/token",
        Headers = [ Authorization = "Basic " & encoded,
                    #"Content-Type" = "application/x-www-form-urlencoded" ],
        Content = Text.ToBinary("grant_type=member_app&member_id=" & member_id
            & "&scope=analytics%3Aread")])),
    access_token = token_response[access_token],

    // === Paginated fetch for one profile/network pair ===
    fetch_one = (cursor as nullable text) as record =>
        let
            body_record = [ filters = [
                profileId = [ eq = "92173569" ],
                reportingPeriod = [ timespan = [
                    since = Date.ToText(date_from, "yyyy-MM-dd"),
                    until = Date.ToText(Date.From(DateTime.LocalNow()), "yyyy-MM-dd")
                ]]
            ]],
            has_cursor = cursor <> null and cursor <> "",
            raw = Web.Contents("https://platform.hootsuite.com", [
                RelativePath = "/v1/analytics/posts?datatype=ORGANIC&networkId=LINKEDINCOMPANY&limit=100"
                    & (if has_cursor then "&cursor=" & cursor else ""),
                Headers = [ Authorization = "Bearer " & access_token,
                            #"Content-Type" = "application/json" ],
                Content = Json.FromValue(body_record)]),
            resp       = Json.Document(raw),
            next_cursor = try resp[nextCursor] otherwise null
        in
            [ data = resp[data], cursor = next_cursor ],

    // === List.Generate drives pagination ===
    pages = List.Generate(
        () => fetch_one(null),
        each [data] <> null,
        each fetch_one([cursor]),
        each [data]),

    // === Combine pages and expand ===
    all_rows    = List.Combine(pages),
    base_table  = Table.FromList(all_rows, Splitter.SplitByNothing()),
    expand_base = Table.ExpandRecordColumn(base_table, "Column1",
                    {"externalId", "sourceLink", "metrics", "campaign"}),

    // === Dynamic metrics expansion ===
    buffered    = Table.Buffer(expand_base),
    all_fields  = List.Distinct(List.Combine(
                    List.Transform(buffered[metrics], each Record.FieldNames(_)))),
    expanded    = Table.ExpandRecordColumn(buffered, "metrics", all_fields)
in
    expanded
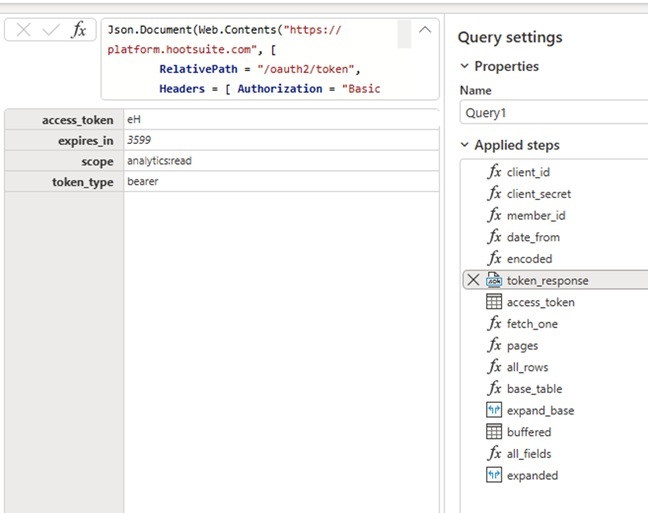
Pagination is where most API connections get stuck. APIs return data one page at a time, and your query has to go through every page to collect the full dataset.
The natural approach in M is a recursive function, but recursion is not that reliable here for language-level reasons. The dependable pattern is List. Generate, which fetches the first page, keeps requesting the next page until the data runs out, and returns the combined result.
// ❌ Cursor in body — API ignores it, page 1 loops forever

body_record = [ filters = [...], cursor = cursor ]

// ✅ Cursor in RelativePath — API advances correctly

RelativePath = "/v1/analytics/posts?datatype=ORGANIC&networkId=LINKEDINCOMPANY&limit=100"

    & (if has_cursor then "&cursor=" & cursor else ""),[EL1]

list each time

),
The natural M approach to pagination is a recursive function. This runs into two language-level problems: meta is a reserved keyword in M and cannot be used as a variable name, and multi-parameter recursive functions using @ self-reference are unreliable. Both problems disappear when you use List. Generate instead:
pages = List.Generate(
    () => fetch_one(null),          // initial call: no cursor
    each [data] <> null,            // stop when data is empty
    each fetch_one([cursor]),       // advance: pass cursor from last response
    each [data]                     // extract: return the data list each time
),Once those queries have been ironed out in Power BI Desktop, it’s time to move them into Dataflow Gen2 in Microsoft Fabric for production use. Because running API calls directly in the semantic model can cause problems – your report refreshes start hitting the API directly, which can spike memory, and worst of all, gets capped by your Power BI capacity.
In a Dataflow, those API calls are run on Fabric compute separately – and the semantic model just reads from clean tables. This makes refreshes a whole lot faster and a whole lot lighter. It’s essentially the same principle that makes offloading extraction to a database so useful – a top we’ll be covering in the next section.
Finding this too technical? Contact us to configure your API connection!
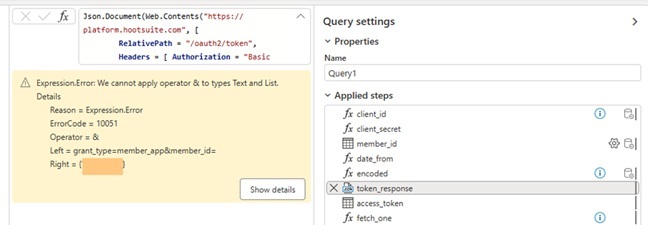
Power BI Desktop implicitly extracts a scalar from a single-row table column reference. Dataflow Gen2 always returns a list. Every _Config[field] reference must become _Config[field]{0}:
// ❌ Desktop only
client_id = _Config[hs_client_id],

// ✅ Works in Desktop and Dataflow Gen2
client_id = _Config[hs_client_id]{0},
The error message for this is:
Expression.Error: We cannot apply operator & to types Text and List.As soon as you see types Text and List, add {0} to every _Config reference in the query.
These are the errors we hit most often when connecting an API to Power BI, and how to fix each one.
| Error | Cause | Fix |
| 400 on analytics endpoint, scope field is empty | member_app grant returns no default scope | Add &scope=analytics%3Aread to token request body |
| 400 “filters key required” | Filter properties sent at top level of body | Wrap all filter properties under a “filters” key |
| “Cannot apply & to types Text and List” | _Config column reference returns list in Dataflow Gen2 | Add {0} to every _Config[field] reference |
| Duplicate rows, query hangs on large date ranges | Pagination cursor in POST body instead of URL | Move cursor to RelativePath query string |
| Credential prompt on scheduled refresh | Full dynamic URL used instead of RelativePath | Use RelativePath in Web.Contents options record |
| Publishing API works; Analytics API returns 403 | Hootsuite account plan restriction (LinkedIn) | Raise support ticket; use empty table stub to unblock refresh |
When an API returns a 400 or 403, Power Query’s default message doesn’t tell you much – just the status code, not the reason. Adding ManualStatusHandling to the Web Contents call captures the raw error body – and that’s what actually tells you why the request went wrong. Paste that body into an AI assistant, and you’ll probably get your problem fixed with a single go.
The example above is just one of three routes you can take. There are three approaches in total – and the right one for you will depend on the size of your data and how much you want to be messing around with it.
1. Custom connectors. A custom connector is a bit of M code packaged up as a .mez file, which Power BI can then use to connect directly to an API. Microsoft provides a Power Query SDK for building them. This works great for lightweight APIs and small to medium size datasets, but it can start to hit API limits on larger datasets because Power BI will resend requests every time a query step or preview runs.
2. Business Intelligence Data Warehouse. If you’re dealing with a bigger or more complex data set, it’s often better to extract from the API into an Azure SQL Server database first. We tend to write Python that runs on a schedule inside an Azure Cloud Function and inserts the data into Azure SQL. Because the extraction happens outside Power BI, it avoids the M-based limitations and can handle a lot more requests. Power BI then just reads from clean pre-aggregated tables.
3. Pre-built Power BI connectors. Want to avoid writing and maintaining code? – You can just buy a connector off the shelf. This means you don’t have to worry about building and keeping it up to date – so your team can focus on analysing data instead of extracting it. Our own connectors take this approach, and we cover them next.
Vidi Corp offers pre-built Power BI connectors that extract data from popular APIs into an Azure SQL Server database. We’re talking QuickBooks Online, HubSpot, Xero, Stripe, Shopify, ClickUp, Zoom and loads more. Because the heavy lifting of sending API requests happens at the database level, Power BI stays fast and is only used for pulling and visualising the data.
Every API changes over time – endpoints get moved, authentication gets updated, limits get shifted. With a pre-built connector, we take on the code and the ongoing maintenance, so if a refresh breaks, that’s our problem to fix – not yours. You get a stable connection without having to do a thing.
An accounting services firm used our Power BI QuickBooks Online connector to automate data extraction for multiple clients. Their SVP of Strategy and Operations reported that they saw improved data quality over the previous connector, and KPI updates were happening a lot faster.
Raw API responses are barely built for reporting. Many connectors just dump a load of loosely documented tables and leave you to untangle them. We transform the data into a clean, structured format before it reaches you, so it’s ready to model and visualise.
We did a multi-entity QuickBooks Online integration for Modern Cannabis. Their CPO described the result as automated, accurate, and visually intuitive reporting across entities, which really made a difference to their decision-making with real-time financial insight
Every client who gives one of our connectors a go gets a free Power BI template to boot. And it’s a real head starter – a ready-made data model with all the formulas already built to make the numbers match up with the source system, then you can mess around with it as much as you like after installation.
Angel Oak Accounting, a cloud-based bookkeeping and fractional CFO firm, have had great results with our QuickBooks Online to Power BI integration. Their CEO reckons it saves them around 4 hours a month, which in turn has added value to their brand and customer service
There are a few Power BI best practices to keep in mind to stop an API connection falling over once it’s live:
Connecting an API to Power BI is actually a doable thing, and the pattern is pretty consistent: find the spec, sort out the authentication, get the response sorted, manage your pagination, then move the load to a Dataflow or database for production time. Every error is a result of breaking one of the rules you can learn.
If you’d rather not build and maintain that yourself, our pre-built connectors will extract your data into Azure SQL and come with a free Power BI dashboard to get you started – all you have to do is contact us to discuss your data source and the fastest route to a working connection.
Yeah, it’s totally possible. Power BI connects to REST APIs using Power Query (M), native connectors like OData, or custom connectors we make for you. For secure and scalable access, custom connectors or a database pipeline are the way to go.
You just need to match the method in the API’s documentation to the type of credential Power BI can handle. That’s usually one of the following: Anonymous, Basic, Web API key, or Organisational account. API keys and OAuth2 tokens are the most common. Just store them as credentials and they stay out of the shared file.
You just need to use List. Generate in Power Query to get through each page until the data runs out, and make sure the pagination cursor is going to where the API says it should – often that’s the URL query string rather than the request body.
Weve got pre-built Power BI connectors for QuickBooks Online, HubSpot, Xero, Stripe, Shopify, ClickUp, Zoom, and loads more. Each one extracts data into an Azure SQL Server database and comes with a free Power BI dashboard.
We can build custom API connections for you – that can either be a custom Power Query connector or a full pipeline that extracts data into Azure SQL for the bigger volumes.


