In this guide we will demonstrate how to automatically extract the data from Zoom into Power BI so that you can analyze it and build your reports.
Navigate to https://vidi-connectors.azurewebsites.net/ and register an account. It is important that you choose an email that you have access to for the purpose of creating an account. When you are done connecting your data you will receive an email with a connection string which you need to connect to data.
Once you are logged in, click on “Zoom” in the side menu and go to the install menu.
You can use the Install menu to input the details of the database where you want the data to flow.
If you do not have a database, make sure you tick the “Use VIDI Database” box and click “Install” at the bottom of the page.
This will launch an automatic process of creating a database in the Vidi Corp Azure account.

Once your database is created you will be automatically redirected to the menu where you can authenticate your company.
Click on “add new company” and “connect to Zoom”.

A new menu will appear where you can authenticate your Zoom account. Authenticate with your username and password and then click on “allow” to give access to your data.
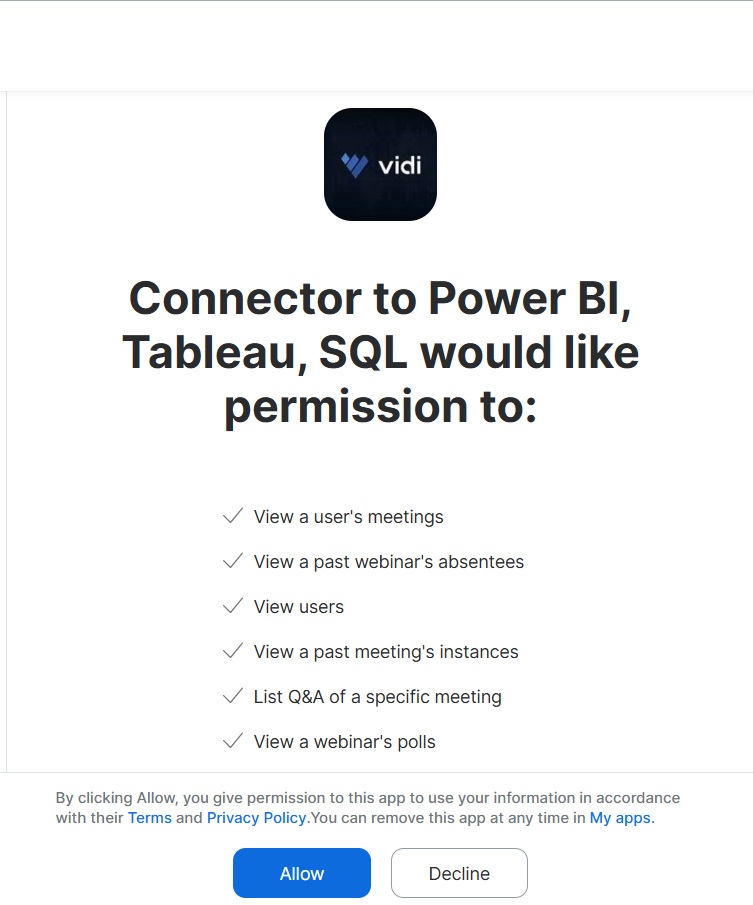
These scope permissions allow us to extract the data from your Zoom account but not edit your data or write any new data in your account. The full list of scopes is:
| Scope Name | Scope Description |
| dashboard:read:list_meetings:admin | View meetings metrics |
| dashboard:read:list_webinars:admin | View webinars metrics |
| meeting:read:past_meeting:admin | View a past meeting |
| meeting:read:list_past_participants:admin | View a past meeting’s participants |
| meeting:read:survey:admin | View a meeting’s survey |
| meeting:read:list_past_instances:admin | View a past meeting’s instances |
| meeting:read:list_meetings:admin | View a user’s meetings |
| meeting:read:registrant:admin | View a meeting’s registrant |
| meeting:read:past_qa:admin | List Q&A of a specific meeting |
| meeting:read:poll:admin | View a meeting’s poll |
| meeting:read:list_registrants:admin | View a meeting’s registrants |
| meeting:read:list_poll_results:admin | View a past meeting’s polls |
| meeting:read:list_polls:admin | View a meeting’s polls |
| meeting:read:meeting:admin | View a meeting |
| webinar:read:webinar:admin | View a webinar |
| phone:read:list_call_logs:admin | View call logs |
| phone:read:list_users:admin | View phone users |
| user:read:list_users:admin | View users |
| user:read:user:admin | View a user |
| webinar:read:poll:admin | View a webinar’s poll |
| webinar:read:list_past_instances:admin | View a past webinar’s instances |
| webinar:read:list_webinars:admin | View a user’s webinars |
| webinar:read:list_panelists:admin | View a webinar’s panelists |
| webinar:read:list_absentees:admin | View a past webinar’s absentees |
| webinar:read:list_past_participants:admin | View a past webinar’s participants |
| webinar:read:list_past_polls:admin | View a past webinar’s polls |
| webinar:read:past_qa:admin | View a past webinar’s Q&A |
| webinar:read:registrant:admin | View a webinar’s registrant |
| webinar:read:list_polls:admin | View a webinar’s polls |
| webinar:read:list_registrants:admin | View a webinar’s registrants |
If you receive any error message or struggle with these steps in any way, please reach out to our support team.
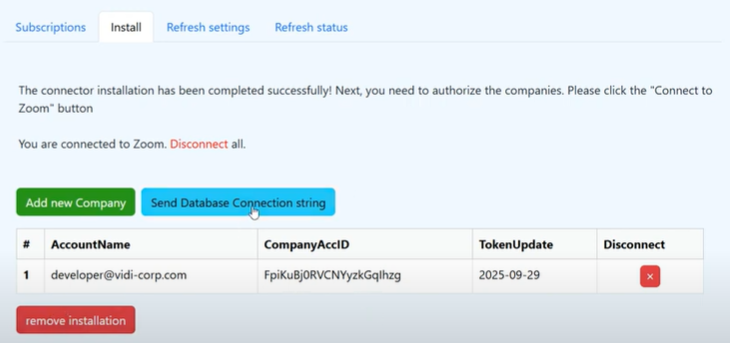
This is the last step of the installation process. Once you connect your data, it will be automatically extracted to your database and refreshed every 4 hours.
Click “Send database credentials string” to get the details you need to connect to your database.
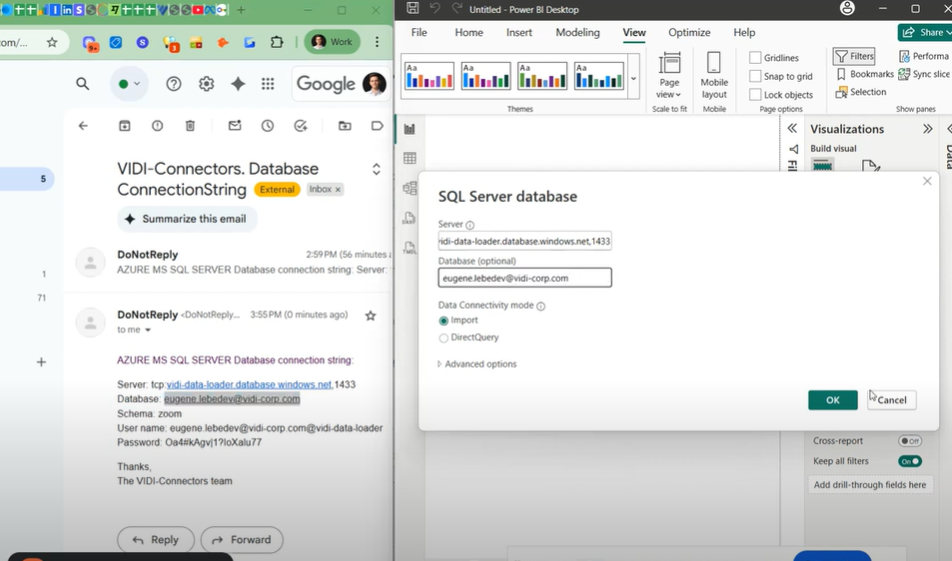
You will receive an email to your registered email address with your database details. You will then need to use those details to extract your data to Power BI.
In Power BI click “get data” -> “Azure SQL Server” and use the details from the email for connection.
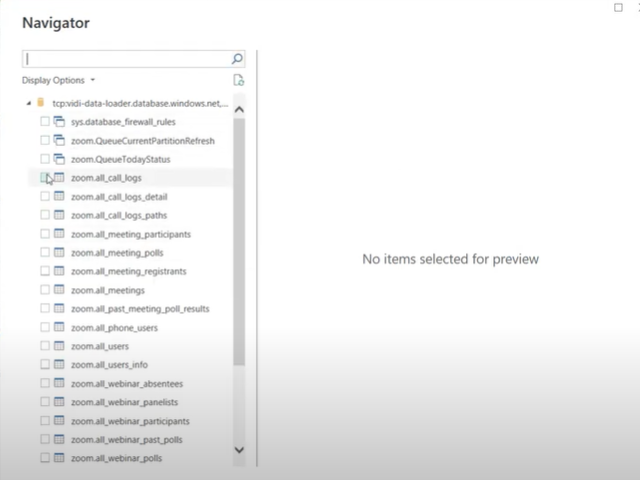
You will then be able to connect to any table in your database. Simply select a table and click “Load” at the bottom of the navigator menu in Power BI.
If you want to disconnect your Zoom data from our app, go to the “Install” tab and click on the “Disconnect” button. This action will revoke our access to your Zoom data so your data refresh would stop. However, your data would still remain in the database that you connected.
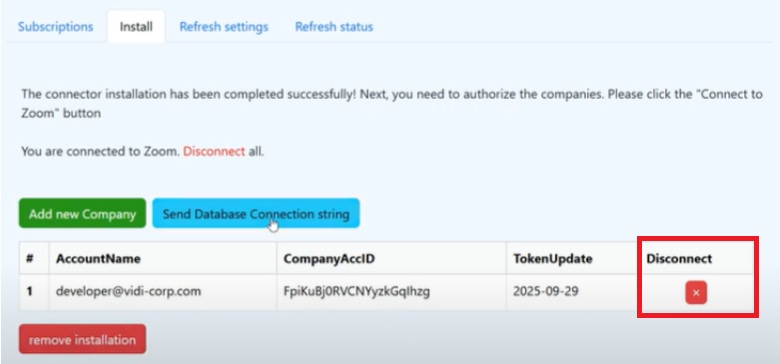
If you want to delete all the data from your connected database, please click on the “Remove Installation” button. This action would delete all the Zoom-related tables from your database.

Do you need any more support with installation or troubleshooting of your Zoom connector? If so, please contact us through our website. Our support hours are 9 am – 5 pm UK time and we will get back to you within 24 hours.
![]()
![]()
![]()