Power BI Bookmarks

17 March 2023
Eugene Lebedev

Eugene Lebedev is a Power BI consultant by background. Before founding Vidi Corp in 2021 he created Power BI reporting for Autodesk. His Power Bi reports were used by VPs of Finance and C-suite of Autodesk. As part of Vidi Corp, Eugene created dashboards for Google, Teleperformance, Delta Airlines and 200+ clients worldwide.

Power BI Bookmarks can help you increase the interactivity of your reports. Bookmark is a powerful tool that allows you to capture the current state of a report, such as the visuals, filters, and slicers that are selected, and save them as a “bookmark.” You can then use this bookmark to quickly open that specific state of the report. For example, you can allow your users to switch between different views of the same page with a click of a button.

Add a Power BI Bookmark

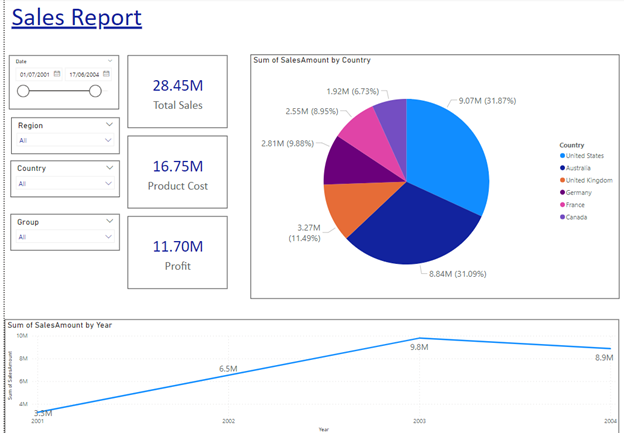
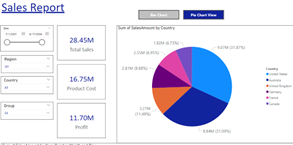
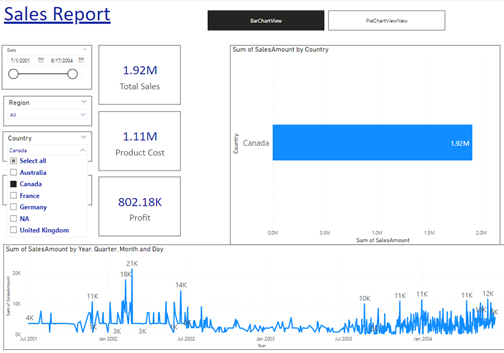
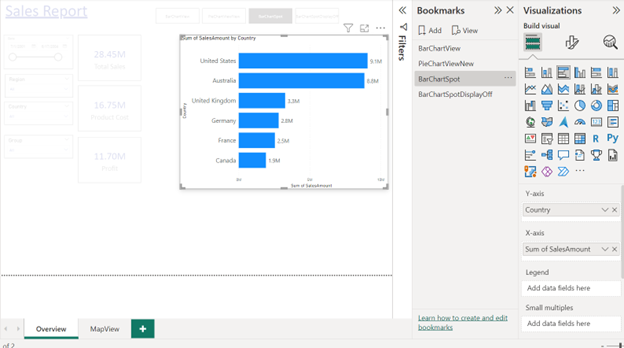
Let’s go through creating a bookmark together. We have a sales report as follows:

creating a bookmark in PowerBI step 1

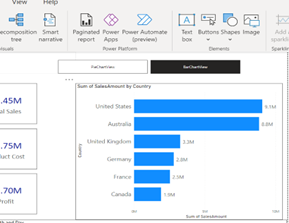
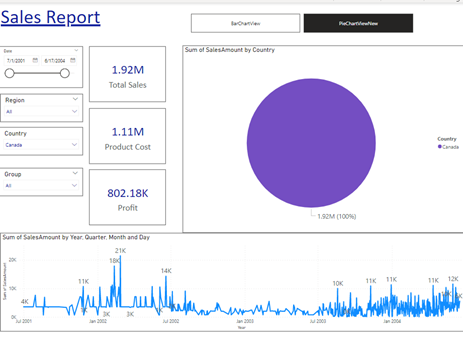
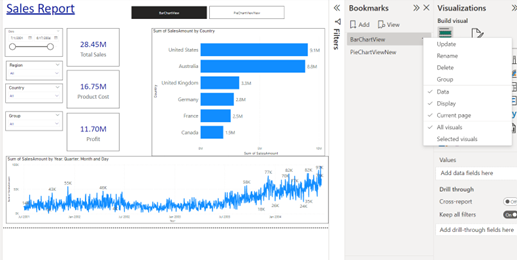
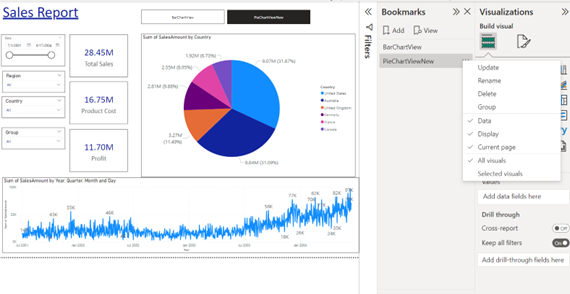
There is another view of this report where Sales by country is represented by a Pie chart instead of a bar chart.

creating a bookmark in PowerBI step 2

You can save both of these views as Power BI bookmarks inside of your report. Doing this will allow you to switch between the 2 saved views with a click of a button.

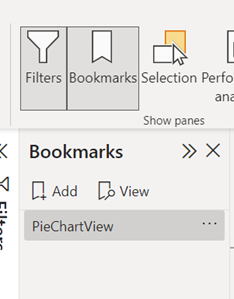
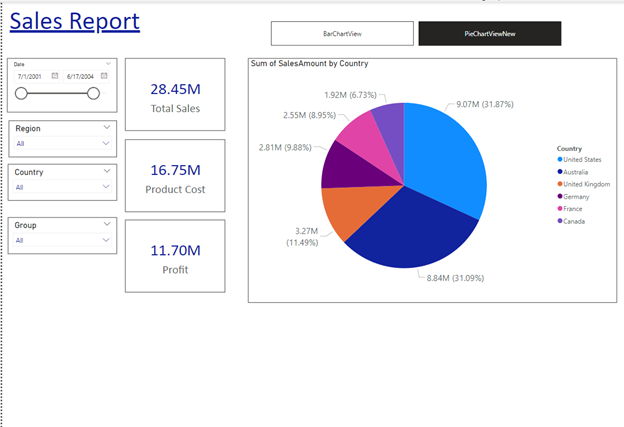
Lets create a view using bookmark for Pie chart:

  1. Open the report and click on view tab
    creating a bookmark in PowerBI step 3
  2. Click on “Bookmarks” in the “Visualizations” section of the ribbon.In the Bookmarks pane that appears on the right-hand side of the screen, click on the “Add” button.
    creating a bookmark in PowerBI step 4
  3. Type a name for your bookmark in the “Name” field. This should be a descriptive name that helps you remember what the bookmark represents. Click on the add button to create the bookmark.
    creating a bookmark in PowerBI step 5
  4. PieChartView bookmark is now created and available in the bookmark section.

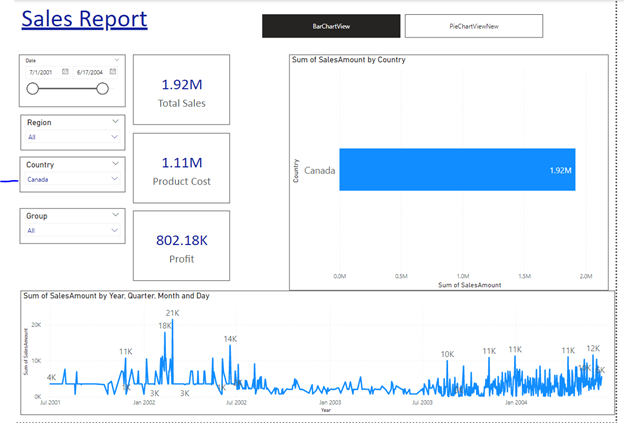
We can follow the same process to create a bookmark for the  bar chart view

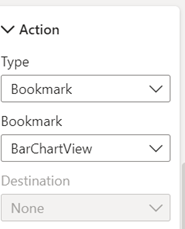
Note: Bookmarks are created for the view that you are seeing on your screen. Make sure that you open a view that you need before saving a bookmark. Also be careful not to overwrite your existing bookmark by mistake.

Connect a Power BI Bookmark to a Button

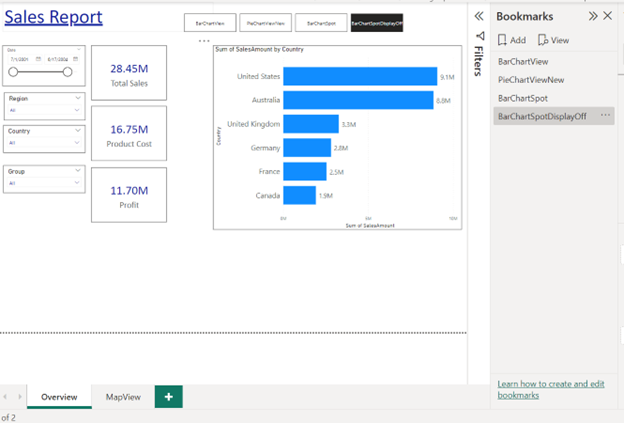
Once a bookmark is created we can put it to use by connecting it to a button. This way when a user clicks on a button, Power BI will take them to a relevant bookmark.

Let’s create a navigation bar in our report to navigate between BarChartView and PieChartView.

There are 2 ways to create a navigation bar in Power BI:

Using individual buttons

We can add blank buttons to the report and then configure bookmarks to each button through its action. Let’s create 2 blanks buttons in our report and connect our bookmarks to them:

  • Click on the “Insert” tab in the ribbon at the top of the screen then click on “Button” in the “Visualizations” section of the ribbon.
    connect a bookmark to a button in PowerBI step 1
  • Once a button is created, we can do some formatting on it such as:
    • Adjusting the size of the button
    • Adding text and a background colour
    • Set colour for each state of the button e.g. light blue by default but dark blue when pressed.
      connect a bookmark to a button in PowerBI step 2
  • We can now assign an action to a button. In the example below we are making it so that when a button is pressed, Power BI takes a user to a BarChartView bookmark.
    connect a bookmark to a button in PowerBI step 3
  • We can similarly create another button and configure it for the PieChartView bookmark.
  • Once both the buttons are created, we can copy them and add them to all the pages.
    connect a bookmark to a button in PowerBI step 4
  • Now we can easily navigate between both bookmarks. If you are navigating on the power BI desktop then Control+Click will work whereas a simple click will work in Power BI Service.

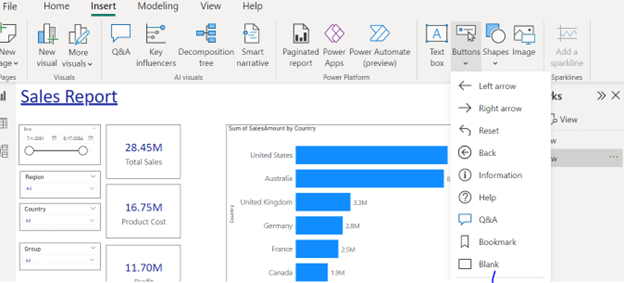
Note: We have used blank buttons as a navigator here but we can also use images or other types of icons instead of blank buttons.

To see how you can optimise your reporting using Power BI, make an enquiry here. 

Using the Bookmark Navigator

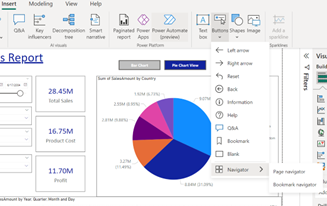
In Nov 2021 Power BI announced a new feature to navigate between bookmarks. It allows you to create button sets corresponding easily and quickly to your bookmarks, and format them in a wide variety of ways. This option will automatically create a navigator on the basis of Power BI bookmarks available in the report and makes it easy for a developer to avoid manual configuration. Let’s create a navigator using this option in our report:

  • Click on the insert tab in the top ribbon then click on the buttons.
    Bookmark Navigator PowerBI step 1
  • Go to the navigator to the bottom and select “Bookmark Navigator”.It will quickly create the buttons and add bookmarks to the action.
    Bookmark Navigator PowerBI step 2
  • Once the buttons are created we can format them according to our requirements. This includes changing the shape, color, state styles and other formatting options.

To see how we can optimise your reporting with Power BI Bookmarks, click here.

Adjusting Power BI Bookmarks

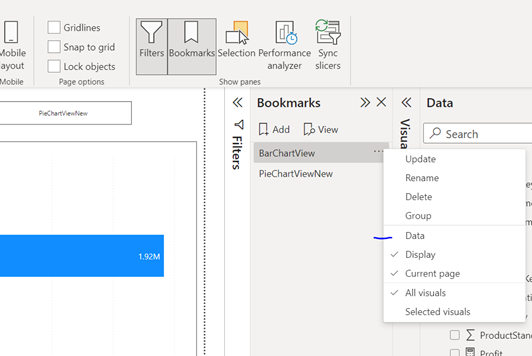
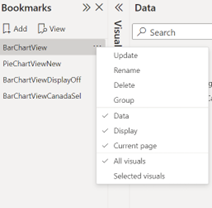
Once a bookmark is created, you can adjust it by updating, renaming, deleting, and grouping.
adjusting bookmarks in PowerBI

Update Bookmark

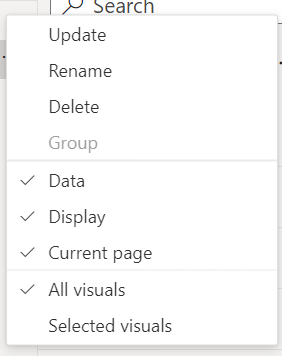
This allows us to update an existing bookmark with the current view. This is useful if you already have a bookmark but you want to edit some visuals on it. For example, my PieChartView bookmark currently looks like this:
Updating bookmarks in PowerBI step 1

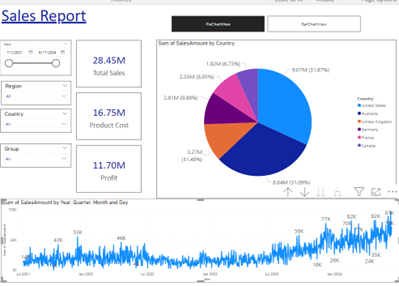
Assume I would like to remove the Trend chart from this view. In that case, I will go to the bookmark and click on PieChart View. Remove the chart from the view and right-click on bookmark and update.
Updating bookmarks in PowerBI step 2

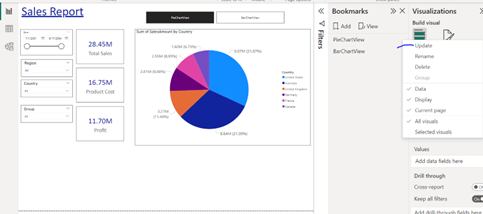
This will now save the view without the trend chart as the PieChartView bookmark.

Rename Bookmark

This allows us to rename the bookmark. In order to rename a bookmark, you can double-click on its name. Alternatively, you can click on three dots and hit rename.
Renaming bookmarks in PowerBI

Delete Bookmark

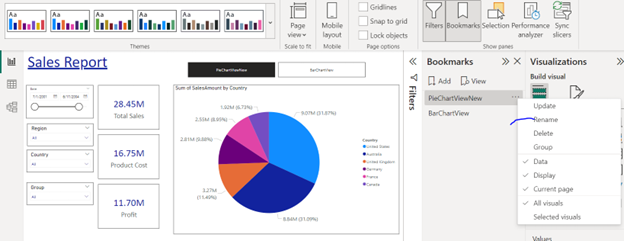
If you don’t need your bookmark anymore, you can hover over the bookmark name and click on the three dots. This will then give you the option to delete it.

This action deletes a bookmark permanently from the report. Please note that if the deleted bookmark is used somewhere in the report, some of the functions of the report might break. Make sure you audit those functions after deleting the bookmark.

Group Bookmarks

As the name suggests it allows us to group the bookmarks or ungroup them from existing groups. This is helpful to keep track of your bookmarks in the report.

In the current context, we have 2 bookmarks that are related to chart types. However, what if we have 10 more bookmarks? It might become difficult for us to find the relevant ones.

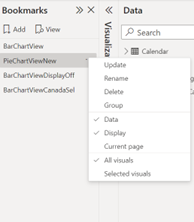
If you want to easily find these 2 bookmarks later then it’s better for us to group them as “Chart Based Bookmarks”. Let’s do it by selecting the 2 bookmarks and clicking on “group”. Now our group is created and we can rename it as needed.

One group is created you can drag another bookmark to it in order to add them in:
Group bookmarks in PowerBI

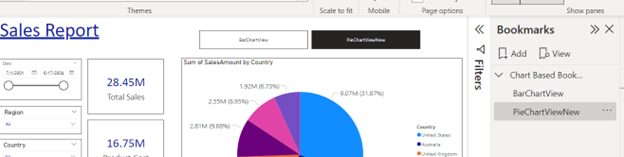
Similarly, we can ungroup the bookmarks by removing them from the existing group.

Power BI Bookmark Customisation Options

Data

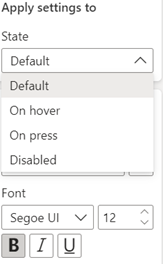
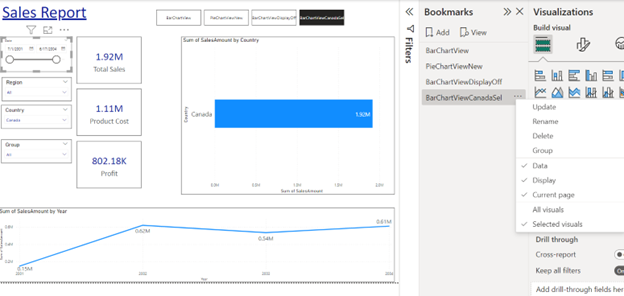
This option allows you to control what filters and slicer selections are used when you switch between the 2 different bookmarks.

When you see a tick next to “data” for your bookmark, this means that Power BI remembered what filter selections were applied when you saved the bookmark. Every time a user opens this bookmark, these exact selections will be applied automatically.

If you see no tick next to “data” for your bookmark, when users go to this bookmark, Power BI uses the latest filter selection that a user applied. In other words, the filter and slicer selections that you had when you were creating the bookmark will not be remembered.

Let’s look at an example together:

We have a configuration where the data tab is checked in the bookmark setting:

  • We have selected Canada as a country from the Country slicer in the BarChartView Bookmark and it is showing below details:
    Bookmark Data Customisation step 1
  • Data has been filtered to Canada in the current view, lets click on PieChartView :
    Bookmark Data Customisation step 2
  • PieChartView is showing data for all the countries. This means that our slicer selection from BarChartView is lost while navigating to PieChartView.
  • If we uncheck the “data” option for our bookmarks, Power BI will remember that the latest selection was “Canada”. It will then pass this latest selection to the PieChartView bookmark.
    Bookmark Data Customisation step 3
  • Let’s update the bookmarks and test it again with the same selection (Canada in the country).
    Bookmark Data Customisation step 4
    Bookmark Data Customisation step 5
  • Now the slicer selection is being passed between the 2 bookmarks as we navigate between them.

Display

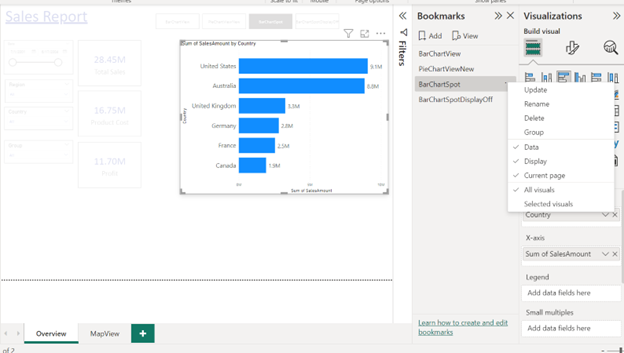
This customisation option allows us to control which elements are displayed in the report. This is used when you want to dynamically hide or show specific elements and also to show/hide spotlight elements.

Consider this example below:

  • In our report, let’s create 2 new bookmarks to understand display property.
  • BarChartSpot Bookmark will capture the view below. We have a spotlight (Click on three dots of the visual and click on spotlight) the bar chart and other visuals are unchanged. The display option is enabled here.
    Bookmark Display Customisation step 1
  • BarChartSpotDisplayOff bookmark will also capture the same view where Bar Chart is on the spotlight but the Display option is disabled here.
    Bookmark Display Customisation step 2
  • Clicking on BarChartSpot bookmarks navigates us to the below view:
    Bookmark Display Customisation step 3
  • Whereas Clicking on BarChartSpotDisplayOff navigates us to the below view:
    Bookmark Display Customisation step 4
  • Even though we have the Spotlight Bar chart in both the bookmarks, BarChartDisplayOff is not showing the Spotlight because the display option was disabled.
  • So, when we use display enabled, it will save the saved state of the view, such as spotlight or highlight, but display disabled will not save it.

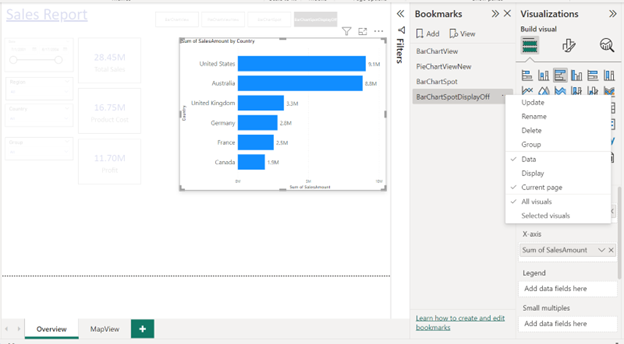
Note: It is recommendable to use display enable options while using bookmarks.

Current Page

When the “Current Page” option is enabled, this option will allow us to jump from one page to another page. If not applied, Power BI will still take a user to the bookmark but it will not change the page. Let’s look at it in more detail using the example below:

  • We have 2 bookmarks in our report as BarChartView and PieChartView .
BarChartView PieChartView
Current page property in PowerBI Current page property in PowerBI step 2
  • Assume we have another page (MapView) where navigation buttons are present which helps in navigating to a particular bookmark (Page). Bookmarks are already added to the action tab of these buttons.

Current Page Option For Bookmarks in PowerBI PieChartView

Current Page is enabled

  • The current page property is enabled by default for both bookmarks. In this state, bookmarks will work as usual. Upon clicking on a button, Power BI will navigate to the corresponding bookmark. For example, if I click on BarChartView button in Map View, it will navigate us to the below bookmark:
    Current page property in PowerBI
  • Similarly, if I click on PieChartView button in MapView, Power BI will navigate us to the relevant bookmark:
    Current page property in PowerBI step 2

The current Page is Disabled

  • Let’s do the below changes to the bookmarks:
BarChartView- Current Page Enabled  PieChartView-Current Page Disabled
Current page property difference in PowerBI after Current page property difference in PowerBI before
  • Now we go to the MapView page and see how bookmarks will behave upon a button click. When we click on the BarChartView button, Power BI navigates us to the bookmark page just like before. However, when we click on the PieChartView button nothing changes and Power BI still shows the same page to us.
  • This happens because earlier we disabled the “current page” property for the PieChartView bookmark. Therefore, Power BI will not allow you to jump to a different page.

All Visuals

This option allows you to save and restore the state of all the elements on the page. If this option is selected, Power BI will remember all the selections in the filter pane, and even whether the filter pane is open or collapsed. This option is enabled by default when you create a bookmark.

Selected Visual

If enabled, this option only saves the current state for the selected visuals in a bookmark. You can select items by holding ctrl and clicking on them in the selection panel.

Consider the example below:

  • We have a region slicer in the report which is currently set to the value “Canada”. We can now select this visual in the selection pane and add a bookmark “BarChartViewCanadaSel”. As we create the bookmark, we can enable the “Selected Visual” property.
    Selected Visual Current state Bookmark PowerBI
  • Remember chart/slicer should be selected while creating this bookmark to use Selected visual property. Multiple elements can be selected by pressing the control key.
  • BarChartViewCanadaSel has captured a value from region slicer as Canada and will be unchanged when switching between bookmarks. Though other slicers will change its value on the selection.

Note: The selected visual property is very important to add to your arsenal.

Power BI Bookmarks Conclusion

Bookmarks are essentially snapshots of your report. You can save the current state of a report in a bookmark including slicer selection, filter selection, the state of visuals, etc. Once you save a certain view of the report, you can connect it to a button so that a click on this button will take a user to this bookmark.

Microsoft Power Platform

Everything you Need to Know

Of the endless possible ways to try and maximise the value of your data, only one is the very best. We’ll show you exactly what it looks like.

To discuss your project and the many ways we can help bring your data to life please contact:

Call

+44 7846 623693

eugene.lebedev@vidi-corp.com

Or complete the form below